This is the multi-page printable view of this section.
Click here to print.
Return to the regular view of this page.
Documentation
Welcome to Slinky, a set of powerful integration tools
designed to bring Slurm
capabilities into Kubernetes. Whether you’re managing
high-performance computing (HPC) workloads or operating within cloud-native
environments, Slinky helps bring together the best of both worlds for efficient
resource management and scheduling.
Slinky is made by SchedMD, the lead developers of Slurm.

1 - slurm-bridge
Download the slurm-bridge repository
here, start using bridge with
the quickstart guide, or read on to learn more.
Slurm and Kubernetes are workload managers originally designed for different
kinds of workloads. Kubernetes excels at scheduling workloads that run for an
indefinite amount of time, with potentially vague resource requirements, on a
single node, with loose policy, but can scale its resource pool infinitely to
meet demand; Slurm excels at quickly scheduling workloads that run for a finite
amount of time, with well defined resource requirements and topology, on
multiple nodes, with strict policy, and a known resource pool.
Why you need slurm-bridge and what it can do
This project enables users to take advantage of the best features of both
workload managers. It contains a Kubernetes scheduler to manage select
workloads from Kubernetes, which allows for co-location of Kubernetes and Slurm
workloads within the same cluster. This means the same hardware can be used to
run both traditional HPC and cloud-like workloads, reducing operating costs.
Using slurm-bridge, workloads can be submitted from within a Kubernetes
context as a Pod, PodGroup, Job, or JobSet, or from a Slurm context
using salloc or sbatch. Workloads submitted via Slurm will execute as they
would in a Slurm-only environment, using slurmd. Workloads submitted from
Kubernetes will have their resource requirements translated into a
representative Slurm job by slurm-bridge. That job will serve as a placeholder
and will be scheduled by the Slurm controller. Upon resource allocation to a K8s
workload by the Slurm controller, slurm-bridge will bind the workload’s pod(s)
to the allocated node(s). At that point, the kubelet will launch and run the pod
the same as it would within a standard Kubernetes instance.

For additional architectural notes, see the
architecture docs.
Features
slurm-bridge enables scheduling of Kubernetes workloads using the Slurm
scheduler, and can take advantage of most of the scheduling features of Slurm
itself. These include:
- Priority: assigns priorities to jobs upon submission and
on an ongoing basis (e.g. as they age).
- Preemption: stop one or more low-priority jobs to let a
high-priority job run.
- QoS: sets of policies affecting scheduling priority,
preemption, and resource limits.
- Fairshare: distribute resources equitably among users
and accounts based on historical usage.
- Reservations: reserve resources for select users or
groups
Supported Versions
- Kubernetes Version: >= v1.29
- Slurm Version: >= 25.05
Current Limitations
- Exclusive, whole node allocations are made for each pod.
Get started using slurm-bridge with the quickstart guide!
Versions:
1.1 - 0.3.x
1.1.1 - Quickstart
This quickstart guide will help you get slurm-bridge running and configured
with your existing cluster.
If you’d like to try out slurm-bridge locally before deploying it on a
cluster, consider following our guide for configuring a local test environment
instead.
This document assumes a basic understanding of
Kubernetes architecture. It
is highly recommended that those who are unfamiliar with the core concepts of
Kubernetes review the documentation on
Kubernetes,
pods, and
nodes before getting
started.
Pre-requisites
- A functional Slurm cluster with:
- A functional Kubernetes cluster that includes the hosts running colocated
kubelet and slurmd and:
- Matching NodeNames in Slurm and Kubernetes for all overlapping nodes
- In the event that the colocated node’s Slurm NodeName does not match the
Kubernetes Node name, you should patch the Kubernetes node with a label to
allow
slurm-bridge to map the colocated Kubernetes and Slurm node.
kubectl patch node $KUBERNETES_NODENAME -p "{\"metadata\":{\"labels\":{\"slinky.slurm.net/slurm-nodename\":\"$SLURM_NODENAME\"}}}"
cgroups/v2 configured on all hosts with a colocated kubelet and slurmd
Installation
1. Install the required helm charts:
helm repo update
helm install cert-manager jetstack/cert-manager \
	--namespace cert-manager --create-namespace --set crds.enabled=true
The helm chart used by slurm-bridge has a number of parameters in
values.yaml
that can be modified to tweak various parameters of slurm-bridge. Most of these
values should work without modification.
Downloading values.yaml:
curl -L https://raw.githubusercontent.com/SlinkyProject/slurm-bridge/refs/tags/v0.2.0/helm/slurm-bridge/values.yaml \
  -o values-bridge.yaml
Depending on your Slurm configuration, you may need to
configure the following variables:
schedulerConfig.partition - this is the default partition with which
slurm-bridge will associate jobs. This partition should only include nodes
that have both [slurmd] and the [kubelet] running. The default value of this
variable is slurm-bridge.sharedConfig.slurmRestApi - the URL used by slurm-bridge to interact with
the Slurm REST API. Changing this value may be necessary if you run the REST
API on a different URL or port. The default value of this variable is
http://slurm-restapi.slurm:6820
3. Download and install the slurm-bridge package from OCI:
helm install slurm-bridge oci://ghcr.io/slinkyproject/charts/slurm-bridge \
  --values=values-bridge.yaml --version=0.3.0 --namespace=slinky --create-namespace
You can check if your cluster deployed successfully with:
kubectl --namespace=slinky get pods
Your output should be similar to:
NAME                                        READY   STATUS    RESTARTS      AGE
slurm-bridge-admission-85f89cf884-8c9jt     1/1     Running   0             1m0s
slurm-bridge-controllers-757f64b875-bsfnf   1/1     Running   0             1m0s
slurm-bridge-scheduler-5484467f55-wtspk     1/1     Running   0             1m0s
Running Your First Job
Now that slurm-bridge is configured, we can write a workload. slurm-bridge
schedules Kubernetes workloads using the Slurm scheduler by translating a
Kubernetes workload in the form of a Jobs, JobSets, Pods, and PodGroups
into a representative Slurm job, which is used for scheduling purposes. Once a
workload is allocated resources, the Kubelet binds the Kubernetes workload to
the allocated resources and executes it. There are sample workload definitions
in the slurm-bridge repo
here.
Here’s an example of a simple job, found in hack/examples/single.yaml:
---
apiVersion: batch/v1
kind: Job
metadata:
  name: job-sleep-single
  namespace: slurm-bridge
  annotations:
    slinky.slurm.net/job-name: job-sleep-single
spec:
  completions: 1
  parallelism: 1
  template:
    spec:
      containers:
        - name: sleep
          image: busybox:stable
          command: [sh, -c, sleep 3]
          resources:
            requests:
              cpu: "1"
              memory: 100Mi
            limits:
              cpu: "1"
              memory: 100Mi
      restartPolicy: Never
Let’s run this job:
❯ kubectl apply -f hack/examples/job/single.yaml
job.batch/job-sleep-single created
At this point, Kubernetes has dispatched our job, it was scheduled by Slurm, and
executed to completion. Let’s take a look at each place that our job shows up.
On the Slurm side, we can observe the placeholder job that was used to schedule
our workload:
slurm@slurm-controller-0:/tmp$ scontrol show jobs
JobId=1 JobName=job-sleep-single
   UserId=slurm(401) GroupId=slurm(401) MCS_label=kubernetes
   Priority=1 Nice=0 Account=(null) QOS=normal
   JobState=CANCELLED Reason=None Dependency=(null)
   Requeue=1 Restarts=0 BatchFlag=0 Reboot=0 ExitCode=0:0
   RunTime=00:00:08 TimeLimit=UNLIMITED TimeMin=N/A
   SubmitTime=2025-07-10T15:52:53 EligibleTime=2025-07-10T15:52:53
   AccrueTime=2025-07-10T15:52:53
   StartTime=2025-07-10T15:52:53 EndTime=2025-07-10T15:53:01 Deadline=N/A
   SuspendTime=None SecsPreSuspend=0 LastSchedEval=2025-07-10T15:52:53 Scheduler=Main
   Partition=slurm-bridge AllocNode:Sid=10.244.5.5:1
   ReqNodeList=(null) ExcNodeList=(null)
   NodeList=slurm-bridge-1
   BatchHost=slurm-bridge-1
   StepMgrEnabled=Yes
   NumNodes=1 NumCPUs=4 NumTasks=1 CPUs/Task=1 ReqB:S:C:T=0:0:*:*
   ReqTRES=cpu=1,mem=96046M,node=1,billing=1
   AllocTRES=cpu=4,mem=96046M,node=1,billing=4
   Socks/Node=* NtasksPerN:B:S:C=0:0:*:* CoreSpec=*
   MinCPUsNode=1 MinMemoryNode=0 MinTmpDiskNode=0
   Features=(null) DelayBoot=00:00:00
   OverSubscribe=NO Contiguous=0 Licenses=(null) LicensesAlloc=(null) Network=(null)
   Command=(null)
   WorkDir=/tmp
   AdminComment={"pods":["slurm-bridge/job-sleep-single-8wtc2"]}
   OOMKillStep=0
Note that the Command field is equal to
(null), and that the JobState field is equal to CANCELLED. These are so
(null), and that the JobState field is equal to CANCELLED. This is because
this Slurm job is only a placeholder - no work is actually done by the
placeholder. Instead, the job is cancelled upon allocation so that the Kubelet
can bind the workload to the selected node(s) for the duration of the job.
We can also look at this job using kubectl:
❯ kubectl describe job --namespace=slurm-bridge job-sleep-single
Name:             job-sleep-single
Namespace:        slurm-bridge
Selector:         batch.kubernetes.io/controller-uid=8a03f5f6-f0c0-4216-ac0b-8c9b70c92eec
Labels:           batch.kubernetes.io/controller-uid=8a03f5f6-f0c0-4216-ac0b-8c9b70c92eec
                  batch.kubernetes.io/job-name=job-sleep-single
                  controller-uid=8a03f5f6-f0c0-4216-ac0b-8c9b70c92eec
                  job-name=job-sleep-single
Annotations:      slinky.slurm.net/job-name: job-sleep-single
Parallelism:      1
Completions:      1
Completion Mode:  NonIndexed
Start Time:       Thu, 10 Jul 2025 09:52:53 -0600
Completed At:     Thu, 10 Jul 2025 09:53:02 -0600
Duration:         9s
Pods Statuses:    0 Active (0 Ready) / 1 Succeeded / 0 Failed
Pod Template:
  Labels:  batch.kubernetes.io/controller-uid=8a03f5f6-f0c0-4216-ac0b-8c9b70c92eec
           batch.kubernetes.io/job-name=job-sleep-single
           controller-uid=8a03f5f6-f0c0-4216-ac0b-8c9b70c92eec
           job-name=job-sleep-single
  Containers:
   sleep:
    Image:      busybox:stable
    Port:       <none>
    Host Port:  <none>
    Command:
      sh
      -c
      sleep 3
    Limits:
      cpu:     1
      memory:  100Mi
    Requests:
      cpu:        1
      memory:     100Mi
    Environment:  <none>
    Mounts:       <none>
  Volumes:        <none>
Events:
  Type    Reason            Age   From            Message
  ----    ------            ----  ----            -------
  Normal  SuccessfulCreate  14m   job-controller  Created pod: job-sleep-single-8wtc2
  Normal  Completed         14m   job-controller  Job completed
As Kubernetes is the context in which this job actually executed, this is
generally the more useful of the two outputs.
Celebrate!
At this point, you should have a cluster running slurm-bridge.
Recommended next steps involve reading through
creating a workload, learning more about the
architecture of slurm-bridge, or browsing our
how-to-guides on administrative tasks.
1.1.2 - Concepts
Concepts related to slurm-bridge internals and design.
1.1.2.1 - Admission
Overview
The Kubernetes documentation
defines admission controllers as:
a piece of code that intercepts requests to the Kubernetes API server prior to
persistence of the resource, but after the request is authenticated and
authorized.
It also states that:
Admission control mechanisms may be validating, mutating, or both. Mutating
controllers may modify the data for the resource being modified; validating
controllers may not.
The slurm-bridge admission controller is a mutating controller. It modifies
any pods within certain namespaces (slurm-bridge, by default) to use the
slurm-bridge scheduler instead of the default Kube scheduler.
Design
Any pods created in certain namespaces will have their .spec.schedulerName
changed to our scheduler.
Managed namespaces are defined as a list of namespace as configured in the
admission controller’s values.yaml for managedNamespaces[].
Sequence Diagram
sequenceDiagram
  autonumber

  participant KAPI as Kubernetes API
  participant SBA as Slurm-Bridge Admission

  KAPI-->>SBA: Watch Pod Create/Update
  opt Pod in managed Namespaces
    SBA->>KAPI: Update `.spec.schedulerName` and Tolerations
    KAPI-->>SBA: Update Response
  end %% opt Pod in managed Namespaces
1.1.2.2 - Architecture
Overview
This document describes the high-level architecture of the Slinky
slurm-bridge.
Big Picture
Directory Map
This project follows the conventions of:
api/
Contains Custom Kubernetes API definitions. These become Custom Resource
Definitions (CRDs) and are installed into a Kubernetes cluster.
cmd/
Contains code to be compiled into binary commands.
config/
Contains yaml configuration files used for kustomize
deployments
docs/
Contains project documentation.
hack/
Contains files for development and Kubebuilder. This includes a kind.sh script
that can be used to create a kind cluster with all pre-requisites for local
testing.
helm/
Contains helm deployments, including the configuration files such as
values.yaml.
Helm is the recommended method to install this project into your Kubernetes
cluster.
internal/
Contains code that is used internally. This code is not externally importable.
internal/controller/
Contains the controllers.
Each controller is named after the Custom Resource Definition (CRD) it manages.
Currently, this consists of the nodeset and the cluster CRDs.
internal/scheduler/
Contains scheduling framework plugins. Currently, this consists of
slurm-bridge.
1.1.2.3 - Controllers
Overview
The Kubernetes documentation
defines controllers as:
control loops that watch the state of your cluster, then make or request
changes where needed. Each controller tries to move the current cluster state
closer to the desired state.
Within slurm-bridge, there are multiple controllers that manage the state of
different bridge components:
- Node Controller - Responsible for the state of nodes in the bridge cluster
- Workload Controller - Responsible for the state of pods and other
workloads running on
slurm-bridge
Node Controller
The node controller is responsible for tainting the managed nodes so the
scheduler component is fully in control of all workload that is bound to those
nodes.
Additionally, this controller will reconcile certain node states for scheduling
purposes. Slurm becomes the source of truth for scheduling among managed nodes.
A managed node is defined as a node that has a colocated kubelet and slurmd
on the same physical host, and the slurm-bridge can schedule on.
sequenceDiagram
  autonumber

  participant KAPI as Kubernetes API
  participant SWC as Slurm Workload Controller
  participant SAPI as Slurm REST API

  loop Reconcile Loop
    KAPI-->>SWC: Watch Kubernetes Nodes

    alt Node is managed
      SWC->>KAPI: Taint Node
      KAPI-->>SWC: Taint Node
    else
      SWC->>KAPI: Untaint Node
      KAPI-->>SWC: Untaint Node
    end %% alt Node is managed

    alt Node is schedulable
      SWC->>SAPI: Drain Node
      SAPI-->>SWC: Taint Node
    else
      SWC->>SAPI: Undrain Node
      SAPI-->>SWC: Undrain Node
    end %% alt Node is schedulable

  end %% loop Reconcile Loop
Workload Controller
The workload controller reconciles Kubernetes Pods and Slurm Jobs. Slurm is the
source of truth for what workload is allowed to run on which managed nodes.
sequenceDiagram
  autonumber

  participant KAPI as Kubernetes API
  participant SWC as Slurm Workload Controller
  participant SAPI as Slurm REST API

  loop Reconcile Loop

  critical Map Slurm Job to Pod
    KAPI-->>SWC: Watch Kubernetes Pods
    SAPI-->>SWC: Watch Slurm Jobs
  option Pod is Terminated
    SWC->>SAPI: Terminate Slurm Job
    SAPI-->>SWC: Return Status
  option Job is Terminated
    SWC->>KAPI: Evict Pod
    KAPI-->>SWC: Return Status
  end %% critical Map Slurm Job to Pod

  end %% loop Reconcile Loop
1.1.2.4 - Scheduler
Overview
In Kubernetes, scheduling refers to making sure that pods are matched to nodes
so that the kubelet can run them.
The scheduler controller in slurm-bridge is responsible for scheduling
eligible pods onto nodes that are managed by slurm-bridge. In doing so, the
slurm-bridge scheduler interacts with the Slurm REST API in order to acquire
allocations for its’ workloads. In slurm-bridge, slurmctld serves as the
source of truth for scheduling decisions.
Design
This scheduler is designed to be a non-primary scheduler (e.g. should not
replace the default kube-scheduler). This means that only certain pods should
be scheduled via this scheduler (e.g. non-critical pods).
This scheduler represents Kubernetes Pods as a Slurm Job, waits for Slurm to
schedule the Job, then informs Kubernetes on which nodes to allocate the
represented Pods. This scheduler defers scheduling decisions to Slurm, hence
certain assumptions about the environment must be met for this to function
correctly.
Sequence Diagram
sequenceDiagram
  autonumber

  actor user as User
  participant KAPI as Kubernetes API
  participant SBS as Slurm-Bridge Scheduler
  participant SAPI as Slurm REST API

  loop Workload Submission
    user->>KAPI: Submit Pod
    KAPI-->>user: Return Request Status
  end %% loop Workload Submission

  loop Scheduling Loop
    SBS->>KAPI: Get Next Pod in Workload Queue
    KAPI-->>SBS: Return Next Pod in Workload Queue

    note over SBS: Honor Slurm scheduling decision
    critical Lookup Slurm Placeholder Job
      SBS->>SAPI: Get Placeholder Job
      SAPI-->>SBS: Return Placeholder Job
    option Job is NotFound
      note over SBS: Translate Pod(s) into Slurm Job
      SBS->>SAPI: Submit Placeholder Job
      SAPI-->>SBS: Return Submit Status
    option Job is Pending
      note over SBS: Check again later...
      SBS->>SBS: Requeue
    option Job is Allocated
      note over SBS: Bind Pod(s) to Node(s) from the Slurm Job
      SBS->>KAPI: Bind Pod(s) to Node(s)
      KAPI-->>SBS: Return Bind Request Status
    end %% Lookup Slurm Placeholder Job
  end %% loop Scheduling Loop
1.1.3 - Tasks
Guides to tasks related to the administration of a cluster running
slurm-bridge.
1.1.3.1 - Running slurm-bridge locally
You may want to run slurm-bridge on a single machine in order to test the
software or familiarize yourself with it prior to installing it on your cluster.
This should only be done for testing and evaluation purposes and should not be
used for production environments.
We have provided a script to do this using Kind and
the
hack/kind.sh
script.
This document assumes a basic understanding of
Kubernetes architecture. It
is highly recommended that those who are unfamiliar with the core concepts of
Kubernetes review the documentation on
Kubernetes,
pods, and
nodes before getting
started.
Pre-requisites
- go 1.17+ must be installed on your system
Setting up your environment
- Install Kind using
go install:
go install sigs.k8s.io/kind@v0.29.0
If you get kind: command not found when running the next step, you may need to
add GOPATH to your PATH:
export GOPATH=$HOME/go
export PATH=$PATH:$GOROOT/bin:$GOPATH/bin
- Confirm that kind is working properly by running the following commands:
kind create cluster

kubectl get nodes --all-namespaces

kind delete cluster
- Clone the
slurm-bridge
repo and enter it:
git clone git@github.com:SlinkyProject/slurm-bridge.git
cd slurm-bridge
Installing slurm-bridge within your environment
Provided with slurm-bridge is the script hack/kind.sh that interfaces with
kind to deploy the slurm-bridge helm chart within your local environment.
- Create your cluster using
hack/kind.sh:
- Familiarize yourself with and use your test environment:
kubectl get pods --namespace=slurm-bridge
kubectl get pods --namespace=slurm
kubectl get pods --namespace=slinky
Celebrate!
At this point, you should have a kind cluster running slurm-bridge.
Cleaning up
hack/kind.sh provides a mechanism by which to destroy your test environment.
Run:
hack/kind.sh --delete
To destroy your kind cluster.
1.1.3.2 - Creating a Workload
In Slurm, all workloads are represented by jobs. In slurm-bridge, however,
there are a number of forms that workloads can take. While workloads can still
be submitted as a Slurm job, slurm-bridge also enables users to submit
workloads through Kubernetes. Most workloads that can be submitted to
slurm-bridge from within Kubernetes are represented by an existing Kubernetes
batch workload primitive.
At this time, slurm-bridge has scheduling support for Jobs,
JobSets, Pods, and PodGroups. If your workload
requires or benefits from co-scheduled pod launch (e.g. MPI, multi-node),
consider representing your workload as a JobSet or
PodGroup.
Using the slurm-bridge Scheduler
slurm-bridge uses an
admission controller
to control which resources are scheduled using the slurm-bridge-scheduler. The
slurm-bridge-scheduler is designed as a non-primary scheduler and is not
intended to replace the default
kube-scheduler.
The slurm-bridge admission controller only schedules pods that request
slurm-bridge as their scheduler or are in a configured namespace. By default,
the slurm-bridge admission controller is configured to automatically use
slurm-bridge as the scheduler for all pods in the configured namespaces.
Alternatively, a pod can specify Pod.Spec.schedulerName=slurm-bridge-scheduler
from any namespace to indicate that it should be scheduler using the
slurm-bridge-scheduler.
You can learn more about the slurm-bridge admission controller
here.
Annotations
Users can better inform or influence slurm-bridge how to represent their
Kubernetes workload within Slurm by adding
annotations on the parent Object.
Example “pause” bare pod to illustrate annotations:
apiVersion: v1
kind: Pod
metadata:
  name: pause
  # `slurm-bridge` annotations on parent object
  annotations:
    slinky.slurm.net/timelimit: "5"
    slinky.slurm.net/account: foo
spec:
  schedulerName: slurm-bridge-scheduler
  containers:
    - name: pause
      image: registry.k8s.io/pause:3.6
      resources:
        limits:
          cpu: "1"
          memory: 100Mi
Example “pause” deployment to illustrate annotations:
apiVersion: apps/v1
kind: Deployment
metadata:
  name: pause
  # `slurm-bridge` annotations on parent object
  annotations:
    slinky.slurm.net/timelimit: "5"
    slinky.slurm.net/account: foo
spec:
  replicas: 2
  selector:
    matchLabels:
      app: pause
  template:
    metadata:
      labels:
        app: pause
    spec:
      schedulerName: slurm-bridge-scheduler
      containers:
        - name: pause
          image: registry.k8s.io/pause:3.6
          resources:
            limits:
              cpu: "1"
              memory: 100Mi
JobSets
This section assumes JobSets is installed.
JobSet pods will be coscheduled and launched together. The JobSet controller is
responsible for managing the JobSet status and other Pod interactions once
marked as completed.
PodGroups
This section assumes PodGroups CRD is installed and the
out-of-tree kube-scheduler is installed and configured as a (non-primary)
scheduler.
Pods contained within a PodGroup will be co-scheduled and launched together. The
PodGroup controller is responsible for managing the PodGroup status and other
Pod interactions once marked as completed.
2 - slurm-operator
Download the slurm-operator repository
here, start using the
operator with a quickstart guide, or read on to learn more.
Slurm and Kubernetes are workload managers originally designed for different
kinds of workloads. Kubernetes excels at scheduling workloads that run for an
indefinite amount of time, with potentially vague resource requirements, on a
single node, with loose policy, but can scale its resource pool infinitely to
meet demand; Slurm excels at quickly scheduling workloads that run for a finite
amount of time, with well defined resource requirements and topology, on
multiple nodes, with strict policy, and a known resource pool.
This project enables the best of both workload managers, unified on Kubernetes.
Why you need slurm-operator and what it can do
slurm-operator allows users to run workloads on Slurm within a Kubernetes
cluster, taking advantage of many of the advanced scheduling features of Slurm
within a cloud-native environment. This allows for more advanced scheduling than
could be achieved within Kubernetes alone, and allows for advanced policies for
job priority and allocations, pre-emption, and accounting.
It contains a Kubernetes operator to deploy and manage certain components of
Slurm clusters. This repository implements custom-controllers and custom
resource definitions (CRDs) designed for managing the lifecycle of Slurm
clusters.

For additional architectural notes, see the architecture docs.
Features
management of Slurm clusters on Kubernetes. The operator takes into
consideration the running workload among Slurm nodes as it needs to scale-in,
upgrade, or otherwise handle node failures. Slurm nodes are marked as
drain before their eventual termination pending scale-in or
upgrade.
Slurm
Slurm is a full featured HPC workload manager. To highlight a few features:
- Accounting: collect accounting information for every
job and job step executed.
- Partitions: job queues with sets of resources and
constraints (e.g. job size limit, job time limit, users permitted).
- Reservations: reserve resources for jobs being
executed by select users and/or select accounts.
- Job Dependencies: defer the start of jobs until the
specified dependencies have been satisfied.
- Job Containers: jobs which run an unprivileged OCI
container bundle.
- Priority: assigns priorities to jobs upon submission and
on an ongoing basis (e.g. as they age).
- Preemption: stop one or more low-priority jobs to let a
high-priority job run.
- QoS: sets of policies affecting scheduling priority,
preemption, and resource limits.
- Fairshare: distribute resources equitably among users
and accounts based on historical usage.
- Node Health Check: periodically check node health via
script.
Quickstart
See the quickstart guide for instructions on installing slurm-operator.
Supported Versions
- Kubernetes Version >= v1.29
- Slurm Version >= 24.11
Current Limitations
- cgroup v2 is the only supported cgroup implementation for Slinky
Upgrades
In 0.X.0 releases, breaking changes may be introduced into newer CRDs. To
upgrade between these versions, uninstall all Slinky charts and delete Slinky
CRDs, then install the new release like normal.
helm --namespace=slurm uninstall slurm
helm --namespace=slinky uninstall slurm-operator
kubectl delete clusters.slinky.slurm.net
kubectl delete nodesets.slinky.slurm.net
License
Copyright (C) SchedMD LLC.
Licensed under the Apache License, Version 2.0 you may not use project except in
compliance with the license.
Unless required by applicable law or agreed to in writing, software distributed
under the License is distributed on an “AS IS” BASIS, WITHOUT WARRANTIES OR
CONDITIONS OF ANY KIND, either express or implied. See the License for the
specific language governing permissions and limitations under the License.
2.1 - 0.1.x
2.1.1 - Overview
slurm-operator
This project provides a framework that runs
Slurm in
Kubernetes.
Overview
This project deploys Slurm on
Kubernetes. These pods coexist with other running
workloads on Kubernetes. This project provides controls over the Slurm cluster
configuration and deployment, along with configurable autoscaling policy for
Slurm compute nodes.
This project allows for much of the functionality within Slurm for workload
management. This includes:
- Priority scheduling: Determine job execution order based on priorities and
weights such as age
- Fair share: Resources are distributed equitably among users based on
historical usage.
- Quality of Service (QoS): set of policies, such as limits of resources,
priorities, and preemption and backfilling.
- Job accounting: Information for every job and job step executed
- Job dependencies: Allow users to specify relationships between jobs, from
start, succeed, fail, or a particular state.
- Workflows with partitioning: Divide cluster resource into sections for job
management
To best enable Slurm in Kubernetes, the project uses
Custom Resources (CRs)
and an
Operator to
extend Kubernetes with custom behaviors for Slurm clusters. In addition,
Helm is used for managing the deployment of the various
components of this project to Kubernetes.
Supported Slurm Versions
Slurm 24.05 Data parsers v40, v41
Quickstart
See the
Quickstart Guide
to install.
Overall Architecture
This is a basic architecture. A more in depth description can be found
in the docs directory.
Known Issues
- CGroups is currently disabled, due to difficulties getting core information
into the pods.
- Updates may be slow, due to needing to wait for sequencing before the
slurm-controller can be deployed.
License
Copyright (C) SchedMD LLC.
Licensed under the Apache License, Version 2.0 you may not use project except in
compliance with the license.
Unless required by applicable law or agreed to in writing, software distributed
under the License is distributed on an “AS IS” BASIS, WITHOUT WARRANTIES OR
CONDITIONS OF ANY KIND, either express or implied. See the License for the
specific language governing permissions and limitations under the License.
2.1.2 - User
2.1.2.1 - Autoscaling
The slurm-operator may be configured to autoscale NodeSets pods based on Slurm
metrics. This guide discusses how to configure autoscaling using KEDA.
Getting Started
Before attempting to autoscale NodeSets, Slinky should be fully deployed to a
Kubernetes cluster and Slurm jobs should be able to run.
Dependencies
Autoscaling requires additional services that are not included in Slinky. Follow
documentation to install Prometheus, Metrics Server, and KEDA.
Prometheus will install tools to report metrics and view them with Grafana. The
Metrics Server is needed to report CPU and memory usage for tools like
kubectl top. KEDA is recommended for autoscaling as it provides usability
improvements over standard the Horizontal Pod Autoscaler (HPA).
To add KEDA in the helm install, run
helm repo add kedacore https://kedacore.github.io/charts
Install the slurm-exporter. This chart is installed as a dependency of the
slurm helm chart by default. Configure using helm/slurm/values.yaml.
Verify KEDA Metrics API Server is running
$ kubectl get apiservice -l app.kubernetes.io/instance=keda
NAME                              SERVICE                                AVAILABLE   AGE
v1beta1.external.metrics.k8s.io   keda/keda-operator-metrics-apiserver   True        22h
KEDA provides the metrics apiserver required by HPA to scale on custom metrics
from Slurm. An alternative like Prometheus Adapter could be used for this, but
KEDA offers usability enhancements and improvements to HPA in addition to
including a metrics apiserver.
Autoscaling
Autoscaling NodeSets allows Slurm partitions to expand and contract in response
to the CPU and memory usage. Using Slurm metrics, NodeSets may also scale based
on Slurm specific information like the number of pending jobs or the size of the
largest pending job in a partition. There are many ways to configure
autoscaling. Experiment with different combinations based on the types of jobs
being run and the resources available in the cluster.
NodeSet Scale Subresource
Scaling a resource in Kubernetes requires that resources such as Deployments and
StatefulSets support the scale subresource. This is also true of the NodeSet
Custom Resource.
The scale subresource gives a standard interface to observe and control the
number of replicas of a resource. In the case of NodeSet, it allows Kubernetes
and related services to control the number of slurmd replicas running as part
of the NodeSet.
Note: NodeSets with replicas: null are intended to scale similar to a
DaemonSet. This is not an appropriate type of NodeSet to use with Autoscaling as
the Slinky operator will handle scaling NodeSet replicas across the cluster
based on the selection criteria.
To manually scale a NodeSet, use the kubectl scale command. In this example,
the NodeSet (nss) slurm-compute-radar is scaled to 1.
$ kubectl scale -n slurm nss/slurm-compute-radar --replicas=1
nodeset.slinky.slurm.net/slurm-compute-radar scaled

$ kubectl get pods -o wide -n slurm -l app.kubernetes.io/instance=slurm-compute-radar
NAME                        READY   STATUS    RESTARTS   AGE     IP            NODE          NOMINATED NODE   READINESS GATES
slurm-compute-radar-p8jwh   1/1     Running   0          2m48s   10.244.4.17   kind-worker   <none>           <none>
This corresponds to the Slurm partition radar.
$ kubectl exec -n slurm statefulset/slurm-controller -- sinfo
PARTITION AVAIL  TIMELIMIT  NODES  STATE NODELIST
radar        up   infinite      1   idle kind-worker
NodeSets may be scaled to zero. In this case, there are no replicas of slurmd
running and all jobs scheduled to that partition will remain in a pending state.
$ kubectl scale nss/slurm-compute-radar -n slurm --replicas=0
nodeset.slinky.slurm.net/slurm-compute-radar scaled
For NodeSets to scale on demand, an autoscaler needs to be deployed. KEDA allows
resources to scale from 0<->1 and also creates an HPA to scale based on scalers
like Prometheus and more.
KEDA ScaledObject
KEDA uses the Custom Resource ScaledObject to monitor and scale a resource. It
will automatically create the HPA needed to scale based on external triggers
like Prometheus. With Slurm metrics, NodeSets may be scaled based on data
collected from the Slurm restapi.
This example ScaledObject will watch the number of jobs pending for the
partition radar and scale the NodeSet slurm-compute-radar until a threshold
value is satisfied or maxReplicaCount is reached.
apiVersion: keda.sh/v1alpha1
kind: ScaledObject
metadata:
  name: scale-radar
spec:
  scaleTargetRef:
    apiVersion: slinky.slurm.net/v1alpha1
    kind: NodeSet
    name: slurm-compute-radar
  idleReplicaCount: 0
  minReplicaCount: 1
  maxReplicaCount: 3
  triggers:
    - type: prometheus
      metricType: Value
      metadata:
        serverAddress: http://prometheus-kube-prometheus-prometheus.prometheus:9090
        query: slurm_partition_pending_jobs{partition="radar"}
        threshold: "5"
Note: The Prometheus trigger is using metricType: Value instead of the
default AverageValue. AverageValue calculates the replica count by averaging
the threshold across the current replica count.
Check [ScaledObject] documentation for a full list of allowable options.
In this scenario, the ScaledObject scale-radar will query the Slurm metric
slurm_partition_pending_jobs from Prometheus with the label
partition="radar".
When there is activity on the trigger (at least one pending job), KEDA will
scale the NodeSet to minReplicaCount and then let HPA handle scaling up to
maxReplicaCount or back down to minReplicaCount. When there is no activity
on the trigger after a configurable amount of time, KEDA will scale the NodeSet
to idleReplicaCount. See the KEDA documentation on idleReplicaCount for
more examples.
Note: The only supported value for idleReplicaCount is 0 due to
limitations on how the HPA controller works.
To verify a KEDA ScaledObject, apply it to the cluster in the appropriate
namespace on a NodeSet that has no replicas.
$ kubectl scale nss/slurm-compute-radar -n slurm --replicas=0
nodeset.slinky.slurm.net/slurm-compute-radar scaled
Wait for Slurm to report that the partition has no nodes.
$ slurm@slurm-controller-0:/tmp$ sinfo -p radar
PARTITION AVAIL  TIMELIMIT  NODES  STATE NODELIST
radar        up   infinite      0    n/a
Apply the ScaledObject using kubectl to the correct namespace and verify the
KEDA and HPA resources are created.
$ kubectl apply -f scaledobject.yaml -n slurm
scaledobject.keda.sh/scale-radar created

$ kubectl get -n slurm scaledobjects
NAME           SCALETARGETKIND                     SCALETARGETNAME        MIN   MAX   TRIGGERS     AUTHENTICATION   READY   ACTIVE   FALLBACK   PAUSED    AGE
scale-radar    slinky.slurm.net/v1alpha1.NodeSet   slurm-compute-radar    1     5     prometheus                    True    False    Unknown    Unknown   28s

$ kubectl get -n slurm hpa
NAME                    REFERENCE                      TARGETS       MINPODS   MAXPODS   REPLICAS   AGE
keda-hpa-scale-radar    NodeSet/slurm-compute-radar    <unknown>/5   1         5         0          32s
Once the [ScaledObject] and HPA are created, initiate some jobs to test that
the NodeSet scale subresource is scaled in response.
$ sbatch --wrap "sleep 30" --partition radar --exclusive
The NodeSet will scale to minReplicaCount in response to activity on the
trigger. Once the number of pending jobs crosses the configured threshold
(submit more exclusive jobs to the partition), more replicas will be created to
handle the additional demand. Until the threshold is exceeded, the NodeSet
will remain at minReplicaCount.
Note: This example only works well for single node jobs, unless threshold
is set to 1. In this case, HPA will continue to scale up NodeSet as long as
there is a pending job until up until it reaches the maxReplicaCount.
After the default coolDownPeriod of 5 minutes without activity on the trigger,
KEDA will scale the NodeSet down to 0.
2.1.2.2 - Slurm
Slurm
Slurm is an open source, fault-tolerant, and highly scalable cluster
management and job scheduling system for large and small Linux clusters. Slurm
requires no kernel modifications for its operation and is relatively
self-contained. As a cluster workload manager, Slurm has three key functions.
First, it allocates exclusive and/or non-exclusive access to resources
(compute nodes) to users for some duration of time so they can perform work.
Second, it provides a framework for starting, executing, and monitoring work
(normally a parallel job) on the set of allocated nodes. Finally, it
arbitrates contention for resources by managing a queue of pending work.
Optional plugins can be used for accounting, advanced reservation, gang
scheduling (time sharing for parallel jobs), backfill scheduling, topology
optimized resource selection, resource limits by user or bank account, and
sophisticated multifactor job prioritization algorithms.
Architecture
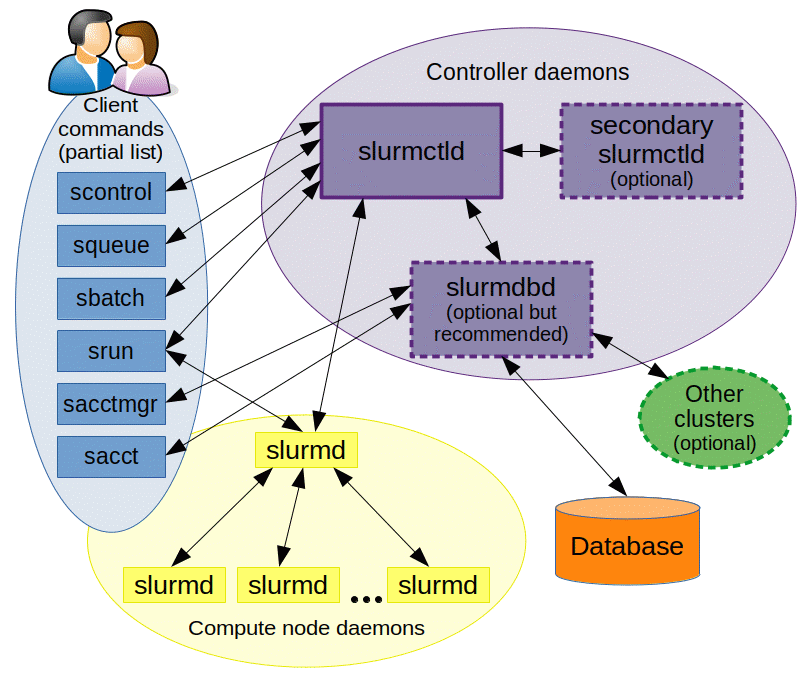
See the Slurm architecture docs for more information.
2.1.3 - Dev
2.1.3.1 - Architecture
Overview
This document describes the high-level architecture of the Slinky
slurm-operator.
Big Picture
The slurm-operator follows the Kubernetes operator
pattern.
Operators are software extensions to Kubernetes that make use of custom
resources to manage applications and their components. Operators follow
Kubernetes principles, notably the control loop.
The slurm-operator has one controller for each Custom Resource Definition
(CRD) that it is responsible to manage. Each controller has a control loop where
the state of the Custom Resource (CR) is reconciled.
Often, an operator is only concerned about data reported by the Kubernetes API.
In our case, we are also concerned about data reported by the Slurm API, which
influences how the slurm-operator reconciles certain CRs.
Directory Map
This project follows the conventions of:
api/
Contains Custom Kubernetes API definitions. These become Custom Resource
Definitions (CRDs) and are installed into a Kubernetes cluster.
cmd/
Contains code to be compiled into binary commands.
config/
Contains yaml configuration files used for kustomize deployments.
docs/
Contains project documentation.
hack/
Contains files for development and Kubebuilder. This includes a kind.sh script
that can be used to create a kind cluster with all pre-requisites for local
testing.
helm/
Contains helm deployments, including the configuration files such as
values.yaml.
Helm is the recommended method to install this project into your Kubernetes
cluster.
internal/
Contains code that is used internally. This code is not externally importable.
internal/controller/
Contains the controllers.
Each controller is named after the Custom Resource Definition (CRD) it manages.
Currently, this consists of the nodeset and the cluster CRDs.
2.1.3.2 - Cluster Control
Overview
This controller is responsible for managing and reconciling the Cluster CRD. A
CRD represents communication to a Slurm cluster via slurmrestd and auth/jwt.
This controller uses the Slurm client library.
Sequence Diagram
sequenceDiagram
    autonumber

    actor User as User
    participant KAPI as Kubernetes API
    participant CC as Cluster Controller
    box Operator Internals
        participant SCM as Slurm Client Map
        participant SEC as Slurm Event Channel
    end %% Operator Internals

    note over KAPI: Handle CR Creation
    User->>KAPI: Create Cluster CR
    KAPI-->>CC: Watch Cluster CRD
    CC->>+KAPI: Get referenced secret
    KAPI-->>-CC: Return secret
    create participant SC as Slurm Client
    CC->>+SC: Create Slurm Client for Cluster
    SC-->>-CC: Return Slurm Client Status
    loop Watch Slurm Nodes
        SC->>+SAPI: Get Slurm Nodes
        SAPI-->>-SC: Return Slurm Nodes
        SC->>SEC: Add Event for Cache Delta
    end %% loop Watch Slurm Nodes
    CC->>SCM: Add Slurm Client to Map
    CC->>+SC: Ping Slurm Control Plane
    SC->>+SAPI: Ping Slurm Control Plane
    SAPI-->>-SC: Return Ping
    SC-->>-CC: Return Ping
    CC->>KAPI: Update Cluster CR Status

    note over KAPI: Handle CR Deletion
    User->>KAPI: Delete Cluster CR
    KAPI-->>CC: Watch Cluster CRD
    SCM-->>CC: Lookup Slurm Client
    destroy SC
    CC-)SC: Shutdown Slurm Client
    CC->>SCM: Remove Slurm Client from Map

    participant SAPI as Slurm REST API
2.1.3.3 - Develop
This document aims to provide enough information that you can get started with
development on this project.
Getting Started
You will need a Kubernetes cluster to run against. You can use KIND to get a
local cluster for testing, or run against your choice of remote cluster.
Note: Your controller will automatically use the current context in your
kubeconfig file (i.e. whatever cluster kubectl cluster-info shows).
Dependencies
Install KIND and Golang binaries for pre-commit hooks.
sudo apt-get install golang
make install
Pre-Commit
Install pre-commit and install the git hooks.
sudo apt-get install pre-commit
pre-commit install
Docker
Install Docker and configure rootless Docker.
After, test that your user account and communicate with docker.
Helm
Install Helm.
sudo snap install helm --classic
Skaffold
Install Skaffold.
curl -Lo skaffold https://storage.googleapis.com/skaffold/releases/latest/skaffold-linux-amd64 && \
sudo install skaffold /usr/local/bin/
If google-cloud-sdk is installed, skaffold is available as an additional
component.
sudo apt-get install -y google-cloud-cli-skaffold
Kubernetes Client
Install kubectl.
sudo snap install kubectl --classic
If google-cloud-sdk is installed, kubectl is available as an additional
component.
sudo apt-get install -y kubectl
Running on the Cluster
For development, all Helm deployments use a values-dev.yaml. If they do not
exist in your environment yet or you are unsure, safely copy the values.yaml
as a base by running:
Automatic
You can use Skaffold to build and push images, and deploy components using:
cd helm/slurm-operator/
skaffold run
NOTE: The skaffold.yaml is configured to inject the image and tag into the
values-dev.yaml so they are correctly referenced.
Operator
The slurm operator aims to follow the Kubernetes Operator
pattern.
It uses Controllers, which provide a reconcile function
responsible for synchronizing resources until the desired state is reached on
the cluster.
Install CRDs
When deploying a helm chart with skaffold or helm, the CRDs defined in its
crds/ directory will be installed if not already present in the cluster.
Uninstall CRDs
To delete the Operator CRDs from the cluster:
WARNING: CRDs do not upgrade! The old ones must be uninstalled first so the
new ones can be installed. This should only be done in development.
Modifying the API Definitions
If you are editing the API definitions, generate the manifests such as CRs or
CRDs using:
Slurm Version Changed
If the Slurm version has changed, generate the new OpenAPI spec and its golang
client code using:
NOTE: Update code interacting with the API in accordance with the
slurmrestd plugin lifecycle.
Running the operator locally
Install the operator’s CRDs with make install.
Launch the operator via the VSCode debugger using the “Launch Operator” launch
task.
Because the operator will be running outside of Kubernetes and needs to
communicate to the Slurm cluster, set the following options in you Slurm helm
chart’s values.yaml:
debug.enable=truedebug.localOperator=true
If running on a Kind cluster, also set:
debug.disableCgroups=true
If the Slurm helm chart is being deployed with skaffold, run
skaffold run --port-forward --tail. It is configured to automatically
port-forward the restapi for the local operator to
communicate with the Slurm cluster.
If skaffold is not used, manually run
kubectl port-forward --namespace slurm services/slurm-restapi 6820:6820 for
the local operator to communicate with the Slurm cluster.
After starting the operator, verify it is able to contact the Slurm cluster by
checking that the Cluster CR has been marked ready:
$ kubectl get --namespace slurm clusters.slinky.slurm.net
NAME     READY   AGE
slurm    true    110s
See skaffold port-forwarding to learn how skaffold
automatically detects which services to forward.
2.1.3.4 - NodeSet Controller
Overview
The nodeset controller is responsible for managing and reconciling the NodeSet
CRD, which represents a set of homogeneous Slurm Nodes.
Design
This controller is responsible for managing and reconciling the NodeSet CRD. In
addition to the regular responsibility of managing resources in Kubernetes via
the Kubernetes API, this controller should take into consideration the state of
Slurm to make certain reconciliation decisions.
Sequence Diagram
sequenceDiagram
    autonumber

    actor User as User
    participant KAPI as Kubernetes API
    participant NS as NodeSet Controller
    box Operator Internals
        participant SCM as Slurm Client Map
        participant SEC as Slurm Event Channel
    end %% Operator Internals
    participant SC as Slurm Client
    participant SAPI as Slurm REST API

    loop Watch Slurm Nodes
        SC->>+SAPI: Get Slurm Nodes
        SAPI-->>-SC: Return Slurm Nodes
        SC->>SEC: Add Event for Cache Delta
    end %% loop Watch Slurm Nodes

    note over KAPI: Handle CR Update
    SEC-->>NS: Watch Event Channel
    User->>KAPI: Update NodeSet CR
    KAPI-->>NS: Watch NodeSet CRD
    opt Scale-out Replicas
        NS->>KAPI: Create Pods
    end %% Scale-out Replicas
    opt Scale-in Replicas
        SCM-->>NS: Lookup Slurm Client
        NS->>+SC: Drain Slurm Node
        SC->>+SAPI: Drain Slurm Node
        SAPI-->>-SC: Return Drain Slurm Node Status
        SC-->>-NS: Drain Slurm Node
        alt Slurm Node is Drained
            NS->>KAPI: Delete Pod
        else
            NS->>NS: Check Again Later
        end %% alt Slurm Node is Drained
    end %% opt Scale-in Replicas
2.1.4 - Quickstart Guides
2.1.4.1 - Basic Quickstart
QuickStart Guide
Overview
This quickstart guide will help you get the slurm-operator running and deploy
Slurm clusters to Kubernetes.
Install
Pre-Requiisites
Install the pre-requisite helm charts.
 helm repo add prometheus-community
https://prometheus-community.github.io/helm-charts helm repo add metrics-server
https://kubernetes-sigs.github.io/metrics-server/ helm repo add bitnami
https://charts.bitnami.com/bitnami helm repo add jetstack
https://charts.jetstack.io helm repo update helm install cert-manager
jetstack/cert-manager \
 --namespace cert-manager --create-namespace --set crds.enabled=true helm
install prometheus prometheus-community/kube-prometheus-stack \
 --namespace prometheus --create-namespace --set installCRDs=true
Slurm Operator
Download values and install the slurm-operator from OCI package.
 curl -L
https://raw.githubusercontent.com/SlinkyProject/slurm-operator/refs/tags/v0.1.0/helm/slurm-operator/values.yaml
\
 -o values-operator.yaml helm install slurm-operator
oci://ghcr.io/slinkyproject/charts/slurm-operator \
 --values=values-operator.yaml --version=0.1.0 --namespace=slinky
--create-namespace
Make sure the cluster deployed successfully with:
kubectl --namespace=slinky get pods
Output should be similar to:
 NAME READY STATUS RESTARTS AGE
slurm-operator-7444c844d5-dpr5h 1/1 Running 0 5m00s
slurm-operator-webhook-6fd8d7857d-zcvqh 1/1 Running 0 5m00s
Slurm Cluster
Download values and install a Slurm cluster from OCI package.
 curl -L
https://raw.githubusercontent.com/SlinkyProject/slurm-operator/refs/tags/v0.1.0/helm/slurm/values.yaml
\
 -o values-slurm.yaml helm install slurm
oci://ghcr.io/slinkyproject/charts/slurm \
 --values=values-slurm.yaml --version=0.1.0 --namespace=slurm --create-namespace
Make sure the slurm cluster deployed successfully with:
kubectl --namespace=slurm get pods
Output should be similar to:
 NAME READY STATUS RESTARTS AGE slurm-accounting-0 1/1
Running 0 5m00s slurm-compute-debug-0 1/1 Running 0 5m00s slurm-controller-0 2/2
Running 0 5m00s slurm-exporter-7b44b6d856-d86q5 1/1 Running 0 5m00s
slurm-mariadb-0 1/1 Running 0 5m00s slurm-restapi-5f75db85d9-67gpl 1/1 Running 0
5m00s
Testing
To test Slurm functionality, connect to the controller to use Slurm client
commands:
 kubectl --namespace=slurm exec -it
statefulsets/slurm-controller -- bash --login
On the controller pod (e.g. host slurm@slurm-controller-0), run the following
commands to quickly test Slurm is functioning:
sinfo srun hostname sbatch --wrap="sleep 60" squeue
See Slurm Commands for
more details on how to interact with Slurm.
2.1.4.2 - QuickStart Guide for Google GKE
This quickstart guide will help you get the slurm-operator running and deploy
Slurm clusters to GKE.
Setup
Setup a cluster on GKE.
 gcloud container clusters create
slinky-cluster \
 --location=us-central1-a \
 --num-nodes=2 \
 --node-taints "" \
 --machine-type=c2-standard-16
Setup kubectl to point to your new cluster.
 gcloud
container clusters get-credentials slinky-cluster
Pre-Requisites
Install the pre-requisite helm charts.
 helm repo add
prometheus-community https://prometheus-community.github.io/helm-charts helm
repo add kedacore https://kedacore.github.io/charts helm repo add metrics-server
https://kubernetes-sigs.github.io/metrics-server/ helm repo add bitnami
https://charts.bitnami.com/bitnami helm repo add jetstack
https://charts.jetstack.io helm repo update helm install cert-manager
jetstack/cert-manager \
 --namespace cert-manager --create-namespace --set crds.enabled=true helm
install prometheus prometheus-community/kube-prometheus-stack \
 --namespace prometheus --create-namespace --set installCRDs=true
Slurm Operator
Download values and install the slurm-operator from OCI package.
 curl -L
https://raw.githubusercontent.com/SlinkyProject/slurm-operator/refs/tags/v0.1.0/helm/slurm-operator/values.yaml
\
 -o values-operator.yaml helm install slurm-operator
oci://ghcr.io/slinkyproject/charts/slurm-operator \
 --version 0.1.0 \
 -f values-operator.yaml \
 --namespace=slinky \
 --create-namespace
Make sure the cluster deployed successfully with:
 kubectl
--namespace=slinky get pods
Output should be similar to:
 NAME READY STATUS RESTARTS
AGE slurm-operator-7444c844d5-dpr5h 1/1 Running 0 5m00s
slurm-operator-webhook-6fd8d7857d-zcvqh 1/1 Running 0 5m00s
Slurm Cluster
Download values and install a Slurm cluster from OCI package.
 curl -L
https://raw.githubusercontent.com/SlinkyProject/slurm-operator/refs/tags/v0.1.0/helm/slurm/values.yaml
\
 -o values-slurm.yaml helm install slurm
oci://ghcr.io/slinkyproject/charts/slurm \
 --version 0.1.0 \
 -f values-slurm.yaml \
 --namespace=slurm \
 --create-namespace
Make sure the slurm cluster deployed successfully with:
kubectl --namespace=slurm get pods
Output should be similar to:
 NAME READY STATUS RESTARTS
AGE slurm-accounting-0 1/1 Running 0 5m00s slurm-compute-debug-l4bd2 1/1 Running
0 5m00s slurm-controller-0 2/2 Running 0 5m00s slurm-exporter-7b44b6d856-d86q5
1/1 Running 0 5m00s slurm-mariadb-0 1/1 Running 0 5m00s
slurm-restapi-5f75db85d9-67gpl 1/1 Running 0 5m00s
Testing
To test Slurm functionality, connect to the controller to use Slurm client
commands:
 kubectl --namespace=slurm exec \
 -it statefulsets/slurm-controller -- bash --login
On the controller pod (e.g. host slurm@slurm-controller-0), run the following
commands to quickly test Slurm is functioning:
 sinfo srun
hostname sbatch --wrap="sleep 60" squeue
See Slurm Commands for
more details on how to interact with Slurm.
2.1.4.3 - QuickStart Guide for Microsoft AKS
This quickstart guide will help you get the slurm-operator running and deploy
Slurm clusters to AKS.
Setup
Setup a resource group on AKS
 az group create --name
slinky --location westus2
Setup a cluster on AKS
 az aks create \
 --resource-group slinky \
 --name slinky \
 --location westus2 \
 --node-vm-size Standard_D2s_v3
Setup kubectl to point to your new cluster.
 az aks
get-credentials --resource-group slinky --name slinky
Pre-Requisites
Install the pre-requisite helm charts.
 helm repo add
prometheus-community https://prometheus-community.github.io/helm-charts helm
repo add kedacore https://kedacore.github.io/charts helm repo add metrics-server
https://kubernetes-sigs.github.io/metrics-server/ helm repo add bitnami
https://charts.bitnami.com/bitnami helm repo add jetstack
https://charts.jetstack.io helm repo update helm install cert-manager
jetstack/cert-manager \
 --namespace cert-manager --create-namespace --set crds.enabled=true helm
install prometheus prometheus-community/kube-prometheus-stack \
 --namespace prometheus --create-namespace --set installCRDs=true
Slurm Operator
Download values and install the slurm-operator from OCI package.
 curl -L
https://raw.githubusercontent.com/SlinkyProject/slurm-operator/refs/tags/v0.1.0/helm/slurm-operator/values.yaml
\
 -o values-operator.yaml

helm install slurm-operator oci://ghcr.io/slinkyproject/charts/slurm-operator \
 --version 0.1.0 \
 -f values-operator.yaml \
 --namespace=slinky \
 --create-namespace
Make sure the cluster deployed successfully with:
 kubectl
--namespace=slinky get pods
Output should be similar to:
 NAME READY STATUS RESTARTS
AGE slurm-operator-7444c844d5-dpr5h 1/1 Running 0 5m00s
slurm-operator-webhook-6fd8d7857d-zcvqh 1/1 Running 0 5m00s
Slurm Cluster
Download values and install a Slurm cluster from OCI package.
 curl -L
https://raw.githubusercontent.com/SlinkyProject/slurm-operator/refs/tags/v0.1.0/helm/slurm/values.yaml
\
 -o values-slurm.yaml
By default the values-slurm.yaml file uses standard for
controller.persistence.storageClass and
mariadb.primary.persistence.storageClass. You will need to update this value
to default to use AKS’s default storageClass.
 helm install slurm
oci://ghcr.io/slinkyproject/charts/slurm \
 --version 0.1.0 \
 -f values-slurm.yaml \
 --namespace=slurm \
 --create-namespace
Make sure the slurm cluster deployed successfully with:
kubectl --namespace=slurm get pods
Output should be similar to:
 NAME READY STATUS RESTARTS
AGE slurm-accounting-0 1/1 Running 0 5m00s slurm-compute-debug-l4bd2 1/1 Running
0 5m00s slurm-controller-0 2/2 Running 0 5m00s slurm-exporter-7b44b6d856-d86q5
1/1 Running 0 5m00s slurm-mariadb-0 1/1 Running 0 5m00s
slurm-restapi-5f75db85d9-67gpl 1/1 Running 0 5m00s
Testing
To test Slurm functionality, connect to the controller to use Slurm client
commands:
 kubectl --namespace=slurm exec \
 -it statefulsets/slurm-controller -- bash --login
On the controller pod (e.g. host slurm@slurm-controller-0), run the following
commands to quickly test Slurm is functioning:
 sinfo srun
hostname sbatch --wrap="sleep 60" squeue
See Slurm Commands for
more details on how to interact with Slurm.
2.2 - 0.2.x
2.2.1 - Overview
slurm-operator
This project provides a framework that runs
Slurm in
Kubernetes.
Overview
This project deploys Slurm on
Kubernetes. These pods coexist with other running
workloads on Kubernetes. This project provides controls over the Slurm cluster
configuration and deployment, along with configurable autoscaling policy for
Slurm compute nodes. This project allows for much of the functionality within
Slurm for workload management. This includes:
- Priority scheduling: Determine job execution order based on priorities and
weights such as age
- Fair share: Resources are distributed equitably among users based on
historical usage.
- Quality of Service (QoS): set of policies, such as limits of resources,
priorities, and preemption and backfilling.
- Job accounting: Information for every job and job step executed
- Job dependencies: Allow users to specify relationships between jobs, from
start, succeed, fail, or a particular state.
- Workflows with partitioning: Divide cluster resource into sections for job
management
To best enable Slurm in Kubernetes, the project uses
Custom Resources (CRs)
and an
Operator to
extend Kubernetes with custom behaviors for Slurm clusters. In addition,
Helm is used for managing the deployment of the various
components of this project to Kubernetes.
Supported Slurm Versions
Data Parser: v41
Quickstart
See the
Quickstart Guide
to install.
Overall Architecture
This is a basic architecture. A more in depth description can be found
in the docs directory.
Known Issues
slurmd fails to dynamically register with its pod’s resource limits.
slurmd currently registers and assets the host machine’s resources instead
of its pod resource limits.
slurmd fails to start with cgroups enforcement enabled within a pod.
cgroup.conf is forced to CgroupPlugin=disabled to avoid init failure.
License
Copyright (C) SchedMD LLC.
Licensed under the
Apache License, Version 2.0 you
may not use project except in compliance with the license.
Unless required by applicable law or agreed to in writing, software distributed
under the License is distributed on an “AS IS” BASIS, WITHOUT WARRANTIES OR
CONDITIONS OF ANY KIND, either express or implied. See the License for the
specific language governing permissions and limitations under the License.
2.2.2 - Architecture
Overview
This document describes the high-level architecture of the Slinky
slurm-operator.
Big Picture
The slurm-operator follows the Kubernetes operator
pattern.
Operators are software extensions to Kubernetes that make use of custom
resources to manage applications and their components. Operators follow
Kubernetes principles, notably the control loop.
The slurm-operator has one controller for each Custom Resource Definition
(CRD) that it is responsible to manage. Each controller has a control loop where
the state of the Custom Resource (CR) is reconciled.
Often, an operator is only concerned about data reported by the Kubernetes API.
In our case, we are also concerned about data reported by the Slurm API, which
influences how the slurm-operator reconciles certain CRs.
Directory Map
This project follows the conventions of:
api/
Contains Custom Kubernetes API definitions. These become Custom Resource
Definitions (CRDs) and are installed into a Kubernetes cluster.
cmd/
Contains code to be compiled into binary commands.
config/
Contains yaml configuration files used for kustomize deployments.
docs/
Contains project documentation.
hack/
Contains files for development and Kubebuilder. This includes a kind.sh script
that can be used to create a kind cluster with all pre-requisites for local
testing.
helm/
Contains helm deployments, including the configuration files such as
values.yaml.
Helm is the recommended method to install this project into your Kubernetes
cluster.
internal/
Contains code that is used internally. This code is not externally importable.
internal/controller/
Contains the controllers.
Each controller is named after the Custom Resource Definition (CRD) it manages.
Currently, this consists of the nodeset and the cluster CRDs.
2.2.3 - Autoscaling
The slurm-operator may be configured to autoscale NodeSets pods based on Slurm
metrics. This guide discusses how to configure autoscaling using KEDA.
Getting Started
Before attempting to autoscale NodeSets, Slinky should be fully deployed to a
Kubernetes cluster and Slurm jobs should be able to run.
Dependencies
Autoscaling requires additional services that are not included in Slinky. Follow
documentation to install Prometheus, Metrics Server, and KEDA.
Prometheus will install tools to report metrics and view them with Grafana. The
Metrics Server is needed to report CPU and memory usage for tools like
kubectl top. KEDA is recommended for autoscaling as it provides usability
improvements over standard the Horizontal Pod Autoscaler (HPA).
To add KEDA in the helm install, run
helm repo add kedacore https://kedacore.github.io/charts
Install the slurm-exporter. This chart is installed as a dependency of the
slurm helm chart by default. Configure using helm/slurm/values.yaml.
Verify KEDA Metrics API Server is running
$ kubectl get apiservice -l app.kubernetes.io/instance=keda
NAME                              SERVICE                                AVAILABLE   AGE
v1beta1.external.metrics.k8s.io   keda/keda-operator-metrics-apiserver   True        22h
KEDA provides the metrics apiserver required by HPA to scale on custom metrics
from Slurm. An alternative like Prometheus Adapter could be used for this, but
KEDA offers usability enhancements and improvements to HPA in addition to
including a metrics apiserver.
Autoscaling
Autoscaling NodeSets allows Slurm partitions to expand and contract in response
to the CPU and memory usage. Using Slurm metrics, NodeSets may also scale based
on Slurm specific information like the number of pending jobs or the size of the
largest pending job in a partition. There are many ways to configure
autoscaling. Experiment with different combinations based on the types of jobs
being run and the resources available in the cluster.
NodeSet Scale Subresource
Scaling a resource in Kubernetes requires that resources such as Deployments and
StatefulSets support the scale subresource. This is also true of the NodeSet
Custom Resource.
The scale subresource gives a standard interface to observe and control the
number of replicas of a resource. In the case of NodeSet, it allows Kubernetes
and related services to control the number of slurmd replicas running as part
of the NodeSet.
To manually scale a NodeSet, use the kubectl scale command. In this example,
the NodeSet (nss) slurm-compute-radar is scaled to 1.
$ kubectl scale -n slurm nss/slurm-compute-radar --replicas=1
nodeset.slinky.slurm.net/slurm-compute-radar scaled

$ kubectl get pods -o wide -n slurm -l app.kubernetes.io/instance=slurm-compute-radar
NAME                    READY   STATUS    RESTARTS   AGE     IP            NODE          NOMINATED NODE   READINESS GATES
slurm-compute-radar-0   1/1     Running   0          2m48s   10.244.4.17   kind-worker   <none>           <none>
This corresponds to the Slurm partition radar.
$ kubectl exec -n slurm statefulset/slurm-controller -- sinfo
PARTITION AVAIL  TIMELIMIT  NODES  STATE NODELIST
radar        up   infinite      1   idle kind-worker
NodeSets may be scaled to zero. In this case, there are no replicas of slurmd
running and all jobs scheduled to that partition will remain in a pending state.
$ kubectl scale nss/slurm-compute-radar -n slurm --replicas=0
nodeset.slinky.slurm.net/slurm-compute-radar scaled
For NodeSets to scale on demand, an autoscaler needs to be deployed. KEDA allows
resources to scale from 0<->1 and also creates an HPA to scale based on scalers
like Prometheus and more.
KEDA ScaledObject
KEDA uses the Custom Resource ScaledObject to monitor and scale a resource. It
will automatically create the HPA needed to scale based on external triggers
like Prometheus. With Slurm metrics, NodeSets may be scaled based on data
collected from the Slurm restapi.
This example ScaledObject will watch the number of jobs pending for the
partition radar and scale the NodeSet slurm-compute-radar until a threshold
value is satisfied or maxReplicaCount is reached.
apiVersion: keda.sh/v1alpha1
kind: ScaledObject
metadata:
  name: scale-radar
spec:
  scaleTargetRef:
    apiVersion: slinky.slurm.net/v1alpha1
    kind: NodeSet
    name: slurm-compute-radar
  idleReplicaCount: 0
  minReplicaCount: 1
  maxReplicaCount: 3
  triggers:
    - type: prometheus
      metricType: Value
      metadata:
        serverAddress: http://prometheus-kube-prometheus-prometheus.prometheus:9090
        query: slurm_partition_pending_jobs{partition="radar"}
        threshold: "5"
Note: The Prometheus trigger is using metricType: Value instead of the
default AverageValue. AverageValue calculates the replica count by averaging
the threshold across the current replica count.
Check ScaledObject documentation for a full list of allowable options.
In this scenario, the ScaledObject scale-radar will query the Slurm metric
slurm_partition_pending_jobs from Prometheus with the label
partition="radar".
When there is activity on the trigger (at least one pending job), KEDA will
scale the NodeSet to minReplicaCount and then let HPA handle scaling up to
maxReplicaCount or back down to minReplicaCount. When there is no activity
on the trigger after a configurable amount of time, KEDA will scale the NodeSet
to idleReplicaCount. See the KEDA documentation on idleReplicaCount for
more examples.
Note: The only supported value for idleReplicaCount is 0 due to
limitations on how the HPA controller works.
To verify a KEDA ScaledObject, apply it to the cluster in the appropriate
namespace on a NodeSet that has no replicas.
$ kubectl scale nss/slurm-compute-radar -n slurm --replicas=0
nodeset.slinky.slurm.net/slurm-compute-radar scaled
Wait for Slurm to report that the partition has no nodes.
$ slurm@slurm-controller-0:/tmp$ sinfo -p radar
PARTITION AVAIL  TIMELIMIT  NODES  STATE NODELIST
radar        up   infinite      0    n/a
Apply the ScaledObject using kubectl to the correct namespace and verify the
KEDA and HPA resources are created.
$ kubectl apply -f scaledobject.yaml -n slurm
scaledobject.keda.sh/scale-radar created

$ kubectl get -n slurm scaledobjects
NAME           SCALETARGETKIND                     SCALETARGETNAME        MIN   MAX   TRIGGERS     AUTHENTICATION   READY   ACTIVE   FALLBACK   PAUSED    AGE
scale-radar    slinky.slurm.net/v1alpha1.NodeSet   slurm-compute-radar    1     5     prometheus                    True    False    Unknown    Unknown   28s

$ kubectl get -n slurm hpa
NAME                    REFERENCE                      TARGETS       MINPODS   MAXPODS   REPLICAS   AGE
keda-hpa-scale-radar    NodeSet/slurm-compute-radar    <unknown>/5   1         5         0          32s
Once the ScaledObject and HPA are created, initiate some jobs to test that the
NodeSet scale subresource is scaled in response.
$ sbatch --wrap "sleep 30" --partition radar --exclusive
The NodeSet will scale to minReplicaCount in response to activity on the
trigger. Once the number of pending jobs crosses the configured threshold
(submit more exclusive jobs to the partition), more replicas will be created to
handle the additional demand. Until the threshold is exceeded, the NodeSet
will remain at minReplicaCount.
Note: This example only works well for single node jobs, unless threshold
is set to 1. In this case, HPA will continue to scale up NodeSet as long as
there is a pending job until up until it reaches the maxReplicaCount.
After the default coolDownPeriod of 5 minutes without activity on the trigger,
KEDA will scale the NodeSet down to 0.
2.2.4 - Cluster Controller
Overview
This controller is responsible for managing and reconciling the Cluster CRD. A
CRD represents communication to a Slurm cluster via slurmrestd and auth/jwt.
This controller uses the Slurm client library.
Sequence Diagram
sequenceDiagram
    autonumber

    actor User as User
    participant KAPI as Kubernetes API
    participant CC as Cluster Controller
    box Operator Internals
        participant SCM as Slurm Client Map
        participant SEC as Slurm Event Channel
    end %% Operator Internals

    note over KAPI: Handle CR Creation
    User->>KAPI: Create Cluster CR
    KAPI-->>CC: Watch Cluster CRD
    CC->>+KAPI: Get referenced secret
    KAPI-->>-CC: Return secret
    create participant SC as Slurm Client
    CC->>+SC: Create Slurm Client for Cluster
    SC-->>-CC: Return Slurm Client Status
    loop Watch Slurm Nodes
        SC->>+SAPI: Get Slurm Nodes
        SAPI-->>-SC: Return Slurm Nodes
        SC->>SEC: Add Event for Cache Delta
    end %% loop Watch Slurm Nodes
    CC->>SCM: Add Slurm Client to Map
    CC->>+SC: Ping Slurm Control Plane
    SC->>+SAPI: Ping Slurm Control Plane
    SAPI-->>-SC: Return Ping
    SC-->>-CC: Return Ping
    CC->>KAPI: Update Cluster CR Status

    note over KAPI: Handle CR Deletion
    User->>KAPI: Delete Cluster CR
    KAPI-->>CC: Watch Cluster CRD
    SCM-->>CC: Lookup Slurm Client
    destroy SC
    CC-)SC: Shutdown Slurm Client
    CC->>SCM: Remove Slurm Client from Map

    participant SAPI as Slurm REST API
2.2.5 - Develop
This document aims to provide enough information that you can get started with
development on this project.
Getting Started
You will need a Kubernetes cluster to run against. You can use KIND to get a
local cluster for testing, or run against your choice of remote cluster.
Note: Your controller will automatically use the current context in your
kubeconfig file (i.e. whatever cluster kubectl cluster-info shows).
Dependencies
Install KIND and Golang binaries for pre-commit hooks.
sudo apt-get install golang
make install
Pre-Commit
Install pre-commit and install the git hooks.
sudo apt-get install pre-commit
pre-commit install
Docker
Install Docker and configure rootless Docker.
After, test that your user account and communicate with docker.
Helm
Install Helm.
sudo snap install helm --classic
Skaffold
Install Skaffold.
curl -Lo skaffold https://storage.googleapis.com/skaffold/releases/latest/skaffold-linux-amd64 && \
sudo install skaffold /usr/local/bin/
If google-cloud-sdk is installed, skaffold is available as an additional
component.
sudo apt-get install -y google-cloud-cli-skaffold
Kubernetes Client
Install kubectl.
sudo snap install kubectl --classic
If google-cloud-sdk is installed, kubectl is available as an additional
component.
sudo apt-get install -y kubectl
Running on the Cluster
For development, all Helm deployments use a values-dev.yaml. If they do not
exist in your environment yet or you are unsure, safely copy the values.yaml
as a base by running:
Automatic
You can use Skaffold to build and push images, and deploy components using:
cd helm/slurm-operator/
skaffold run
NOTE: The skaffold.yaml is configured to inject the image and tag into the
values-dev.yaml so they are correctly referenced.
Operator
The slurm operator aims to follow the Kubernetes Operator
pattern.
It uses Controllers, which provide a reconcile function
responsible for synchronizing resources until the desired state is reached on
the cluster.
Install CRDs
When deploying a helm chart with skaffold or helm, the CRDs defined in its
crds/ directory will be installed if not already present in the cluster.
Uninstall CRDs
To delete the Operator CRDs from the cluster:
WARNING: CRDs do not upgrade! The old ones must be uninstalled first so the
new ones can be installed. This should only be done in development.
Modifying the API Definitions
If you are editing the API definitions, generate the manifests such as CRs or
CRDs using:
Slurm Version Changed
If the Slurm version has changed, generate the new OpenAPI spec and its golang
client code using:
NOTE: Update code interacting with the API in accordance with the
slurmrestd plugin lifecycle.
Running the operator locally
Install the operator’s CRDs with make install.
Launch the operator via the VSCode debugger using the “Launch Operator” launch
task.
Because the operator will be running outside of Kubernetes and needs to
communicate to the Slurm cluster, set the following options in you Slurm helm
chart’s values.yaml:
debug.enable=truedebug.localOperator=true
If running on a Kind cluster, also set:
debug.disableCgroups=true
If the Slurm helm chart is being deployed with skaffold, run
skaffold run --port-forward --tail. It is configured to automatically
port-forward the restapi for the local operator to
communicate with the Slurm cluster.
If skaffold is not used, manually run
kubectl port-forward --namespace slurm services/slurm-restapi 6820:6820 for
the local operator to communicate with the Slurm cluster.
After starting the operator, verify it is able to contact the Slurm cluster by
checking that the Cluster CR has been marked ready:
$ kubectl get --namespace slurm clusters.slinky.slurm.net
NAME     READY   AGE
slurm    true    110s
See skaffold port-forwarding to learn how skaffold
automatically detects which services to forward.
2.2.6 - NodeSet Controller
Overview
The nodeset controller is responsible for managing and reconciling the NodeSet
CRD, which represents a set of homogeneous Slurm Nodes.
Design
This controller is responsible for managing and reconciling the NodeSet CRD. In
addition to the regular responsibility of managing resources in Kubernetes via
the Kubernetes API, this controller should take into consideration the state of
Slurm to make certain reconciliation decisions.
Sequence Diagram
sequenceDiagram
    autonumber

    actor User as User
    participant KAPI as Kubernetes API
    participant NS as NodeSet Controller
    box Operator Internals
        participant SCM as Slurm Client Map
        participant SEC as Slurm Event Channel
    end %% Operator Internals
    participant SC as Slurm Client
    participant SAPI as Slurm REST API

    loop Watch Slurm Nodes
        SC->>+SAPI: Get Slurm Nodes
        SAPI-->>-SC: Return Slurm Nodes
        SC->>SEC: Add Event for Cache Delta
    end %% loop Watch Slurm Nodes

    note over KAPI: Handle CR Update
    SEC-->>NS: Watch Event Channel
    User->>KAPI: Update NodeSet CR
    KAPI-->>NS: Watch NodeSet CRD
    opt Scale-out Replicas
        NS->>KAPI: Create Pods
    end %% Scale-out Replicas
    opt Scale-in Replicas
        SCM-->>NS: Lookup Slurm Client
        NS->>+SC: Drain Slurm Node
        SC->>+SAPI: Drain Slurm Node
        SAPI-->>-SC: Return Drain Slurm Node Status
        SC-->>-NS: Drain Slurm Node
        alt Slurm Node is Drained
            NS->>KAPI: Delete Pod
        else
            NS->>NS: Check Again Later
        end %% alt Slurm Node is Drained
    end %% opt Scale-in Replicas
2.2.7 - Slurm
Slurm
Slurm is an open source, fault-tolerant, and highly scalable cluster
management and job scheduling system for large and small Linux clusters. Slurm
requires no kernel modifications for its operation and is relatively
self-contained. As a cluster workload manager, Slurm has three key functions.
First, it allocates exclusive and/or non-exclusive access to resources
(compute nodes) to users for some duration of time so they can perform work.
Second, it provides a framework for starting, executing, and monitoring work
(normally a parallel job) on the set of allocated nodes. Finally, it
arbitrates contention for resources by managing a queue of pending work.
Optional plugins can be used for accounting, advanced reservation, gang
scheduling (time sharing for parallel jobs), backfill scheduling, topology
optimized resource selection, resource limits by user or bank account, and
sophisticated multifactor job prioritization algorithms.
Architecture
See the Slurm architecture docs for more information.
2.2.8 - Quickstart Guides
2.2.8.1 - QuickStart Guide for Amazon EKS
This quickstart guide will help you get the slurm-operator running and deploy
Slurm clusters to Amazon EKS.
Setup
Setup a cluster on EKS.
 eksctl create cluster \
 --name slinky-cluster \
 --region us-west-2 \
 --nodegroup-name slinky-nodes \
 --node-type t3.medium \
 --nodes 2
Setup kubectl to point to your new cluster.
 aws eks
--region us-west-2 update-kubeconfig --name slinky-cluster
Pre-Requisites
Install the pre-requisite helm charts.
 helm repo add
prometheus-community https://prometheus-community.github.io/helm-charts helm
repo add kedacore https://kedacore.github.io/charts helm repo add metrics-server
https://kubernetes-sigs.github.io/metrics-server/ helm repo add bitnami
https://charts.bitnami.com/bitnami helm repo add jetstack
https://charts.jetstack.io helm repo add aws-ebs-csi-driver
https://kubernetes-sigs.github.io/aws-ebs-csi-driver helm repo update helm
install cert-manager jetstack/cert-manager \
 --namespace cert-manager --create-namespace --set crds.enabled=true helm
install prometheus prometheus-community/kube-prometheus-stack \
 --namespace prometheus --create-namespace --set installCRDs=true
Install EBS CSI Driver
 helm install aws-ebs-csi
aws-ebs-csi-driver/aws-ebs-csi-driver -n kube-system
AWS Permissions
You will need to make sure your IAM user has the proper permissions.
Step 1: Identify the IAM Role
Run the following AWS CLI command to get the IAM role attached to your EKS
worker nodes:
 aws eks describe-nodegroup \
 --cluster-name slinky-cluster \
 --nodegroup-name slinky-nodes \
 --query "nodegroup.nodeRole" \
 --output text
This will return something like:
arn:aws:iam::017820679962:role/eksctl-slurm-cluster-nodegroup-my-nod-NodeInstanceRole-hpbRU4WRvvlK
The IAM role name here is
eksctl-slurm-cluster-nodegroup-my-nod-NodeInstanceRole-hpbRU4WRvvlK.
Step 2: Attach the Required IAM Policy for EBS CSI Driver
Attach the AmazonEBSCSIDriverPolicy managed IAM policy to this role.
Run the following command:
 aws iam attach-role-policy \
 --role-name eksctl-slurm-cluster-nodegroup-my-nod-NodeInstanceRole-hpbRU4WRvvlK
\
 --policy-arn arn:aws:iam::aws:policy/service-role/AmazonEBSCSIDriverPolicy
Create StorageClass
You will need to create a StorageClass to use.
Here is an example storageclass.yaml file for a StorageClass
 apiVersion: storage.k8s.io/v1 kind: StorageClass
metadata: name: standard provisioner: ebs.csi.aws.com reclaimPolicy: Delete
volumeBindingMode: WaitForFirstConsumer parameters: type: gp2 fsType: ext4
Create the StorageClass using your storageclass.yaml file.
kubectl apply -f storageclass.yaml
Slurm Operator
Download values and install the slurm-operator. You will need to update the
operator and webhook repository values to point to the desired container
repository.
 curl -L
https://raw.githubusercontent.com/SlinkyProject/slurm-operator/refs/tags/v0.2.1/helm/slurm-operator/values.yaml
\
 -o values-operator.yaml

helm install slurm-operator \
 -f values-operator.yaml \
 --namespace=slinky \
 --create-namespace \
 helm/slurm-operator
Make sure the cluster deployed successfully with:
 kubectl
--namespace=slinky get pods
Output should be similar to:
 NAME READY STATUS RESTARTS
AGE slurm-operator-7444c844d5-dpr5h 1/1 Running 0 5m00s
slurm-operator-webhook-6fd8d7857d-zcvqh 1/1 Running 0 5m00s
Slurm Cluster
Download values and install a Slurm cluster.
 curl -L
https://raw.githubusercontent.com/SlinkyProject/slurm-operator/refs/tags/v0.2.1/helm/slurm/values.yaml
\
 -o values-slurm.yaml

helm install slurm \
 -f values-slurm.yaml \
 --namespace=slurm \
 --create-namespace \
 helm/slurm
Make sure the slurm cluster deployed successfully with:
kubectl --namespace=slurm get pods
Output should be similar to:
 NAME READY STATUS RESTARTS
AGE slurm-accounting-0 1/1 Running 0 5m00s slurm-compute-debug-l4bd2 1/1 Running
0 5m00s slurm-controller-0 2/2 Running 0 5m00s slurm-exporter-7b44b6d856-d86q5
1/1 Running 0 5m00s slurm-mariadb-0 1/1 Running 0 5m00s
slurm-restapi-5f75db85d9-67gpl 1/1 Running 0 5m00s
Testing
To test Slurm functionality, connect to the controller to use Slurm client
commands:
 kubectl --namespace=slurm exec \
 -it statefulsets/slurm-controller -- bash --login
On the controller pod (e.g. host slurm@slurm-controller-0), run the following
commands to quickly test Slurm is functioning:
 sinfo srun
hostname sbatch --wrap="sleep 60" squeue
See Slurm Commands for
more details on how to interact with Slurm.
2.2.8.2 - QuickStart Guide for Google GKE
This quickstart guide will help you get the slurm-operator running and deploy
Slurm clusters to GKE.
Setup
Setup a cluster on GKE.
 gcloud container clusters create
slinky-cluster \
 --location=us-central1-a \
 --num-nodes=2 \
 --node-taints "" \
 --machine-type=c2-standard-16
Setup kubectl to point to your new cluster.
 gcloud
container clusters get-credentials slinky-cluster
Pre-Requisites
Install the pre-requisite helm charts.
 helm repo add
prometheus-community https://prometheus-community.github.io/helm-charts helm
repo add kedacore https://kedacore.github.io/charts helm repo add metrics-server
https://kubernetes-sigs.github.io/metrics-server/ helm repo add bitnami
https://charts.bitnami.com/bitnami helm repo add jetstack
https://charts.jetstack.io helm repo update helm install cert-manager
jetstack/cert-manager \
 --namespace cert-manager --create-namespace --set crds.enabled=true helm
install prometheus prometheus-community/kube-prometheus-stack \
 --namespace prometheus --create-namespace --set installCRDs=true
Slurm Operator
Download values and install the slurm-operator. You will need to update the
operator and webhook repository values to point to the desired container
repository.
 curl -L
https://raw.githubusercontent.com/SlinkyProject/slurm-operator/refs/tags/v0.2.1/helm/slurm-operator/values.yaml
\
 -o values-operator.yaml

helm install slurm-operator \
 -f values-operator.yaml \
 --namespace=slinky \
 --create-namespace \
 helm/slurm-operator
Make sure the cluster deployed successfully with:
 kubectl
--namespace=slinky get pods
Output should be similar to:
 NAME READY STATUS RESTARTS
AGE slurm-operator-7444c844d5-dpr5h 1/1 Running 0 5m00s
slurm-operator-webhook-6fd8d7857d-zcvqh 1/1 Running 0 5m00s
Slurm Cluster
Download values and install a Slurm cluster.
 curl -L
https://raw.githubusercontent.com/SlinkyProject/slurm-operator/refs/tags/v0.2.1/helm/slurm/values.yaml
\
 -o values-slurm.yaml

helm install slurm \
 -f values-slurm.yaml \
 --namespace=slurm \
 --create-namespace \
 helm/slurm
Make sure the slurm cluster deployed successfully with:
kubectl --namespace=slurm get pods
Output should be similar to:
 NAME READY STATUS RESTARTS
AGE slurm-accounting-0 1/1 Running 0 5m00s slurm-compute-debug-l4bd2 1/1 Running
0 5m00s slurm-controller-0 2/2 Running 0 5m00s slurm-exporter-7b44b6d856-d86q5
1/1 Running 0 5m00s slurm-mariadb-0 1/1 Running 0 5m00s
slurm-restapi-5f75db85d9-67gpl 1/1 Running 0 5m00s
Testing
To test Slurm functionality, connect to the controller to use Slurm client
commands:
 kubectl --namespace=slurm exec \
 -it statefulsets/slurm-controller -- bash --login
On the controller pod (e.g. host slurm@slurm-controller-0), run the following
commands to quickly test Slurm is functioning:
 sinfo srun
hostname sbatch --wrap="sleep 60" squeue
See Slurm Commands for
more details on how to interact with Slurm.
2.2.8.3 - QuickStart Guide for Microsoft AKS
This quickstart guide will help you get the slurm-operator running and deploy
Slurm clusters to AKS.
Setup
Setup a resource group on AKS
 az group create --name
slinky --location westus2
Setup a cluster on AKS
 az aks create \
 --resource-group slinky \
 --name slinky \
 --location westus2 \
 --node-vm-size Standard_D2s_v3
Setup kubectl to point to your new cluster.
 az aks
get-credentials --resource-group slinky --name slinky
Pre-Requisites
Install the pre-requisite helm charts.
 helm repo add
prometheus-community https://prometheus-community.github.io/helm-charts helm
repo add kedacore https://kedacore.github.io/charts helm repo add metrics-server
https://kubernetes-sigs.github.io/metrics-server/ helm repo add bitnami
https://charts.bitnami.com/bitnami helm repo add jetstack
https://charts.jetstack.io helm repo update helm install cert-manager
jetstack/cert-manager \
 --namespace cert-manager --create-namespace --set crds.enabled=true helm
install prometheus prometheus-community/kube-prometheus-stack \
 --namespace prometheus --create-namespace --set installCRDs=true
Slurm Operator
Download values and install the slurm-operator. You will need to update the
operator and webhook repository values to point to the desired container
repository.
 curl -L
https://raw.githubusercontent.com/SlinkyProject/slurm-operator/refs/tags/v0.2.1/helm/slurm-operator/values.yaml
\
 -o values-operator.yaml
Make sure you are authenticated and the proper role is assigned to pull your
images.
 az acr login -n slinky

az aks show \
 --resource-group slinky \
 --name slinky \
 --query identityProfile.kubeletidentity.clientId \
 -o tsv

az role assignment create --assignee <clientId from above> \
 --role AcrPull \
 --scope $(az acr show --name slinky --query id -o tsv)

helm install slurm-operator \
 -f values-operator.yaml \
 --namespace=slinky \
 --create-namespace \
 helm/slurm-operator
Make sure the cluster deployed successfully with:
 kubectl
--namespace=slinky get pods
Output should be similar to:
 NAME READY STATUS RESTARTS
AGE slurm-operator-7444c844d5-dpr5h 1/1 Running 0 5m00s
slurm-operator-webhook-6fd8d7857d-zcvqh 1/1 Running 0 5m00s
Slurm Cluster
Download values and install a Slurm cluster.
 curl -L
https://raw.githubusercontent.com/SlinkyProject/slurm-operator/refs/tags/v0.2.1/helm/slurm/values.yaml
\
 -o values-slurm.yaml

helm install slurm \
 -f values-slurm.yaml \
 --namespace=slurm \
 --create-namespace \
 helm/slurm
By default the values-slurm.yaml file uses standard for
controller.persistence.storageClass and
mariadb.primary.persistence.storageClass. You will need to update this value
to default to use AKS’s default storageClass.
Make sure the slurm cluster deployed successfully with:
kubectl --namespace=slurm get pods
Output should be similar to:
 NAME READY STATUS RESTARTS
AGE slurm-accounting-0 1/1 Running 0 5m00s slurm-compute-debug-l4bd2 1/1 Running
0 5m00s slurm-controller-0 2/2 Running 0 5m00s slurm-exporter-7b44b6d856-d86q5
1/1 Running 0 5m00s slurm-mariadb-0 1/1 Running 0 5m00s
slurm-restapi-5f75db85d9-67gpl 1/1 Running 0 5m00s
Testing
To test Slurm functionality, connect to the controller to use Slurm client
commands:
 kubectl --namespace=slurm exec \
 -it statefulsets/slurm-controller -- bash --login
On the controller pod (e.g. host slurm@slurm-controller-0), run the following
commands to quickly test Slurm is functioning:
 sinfo srun
hostname sbatch --wrap="sleep 60" squeue
See Slurm Commands for
more details on how to interact with Slurm.
2.3 - 0.3.x
2.3.1 - Concepts
Concepts related to slurm-operator internals and design.
2.3.1.1 - Architecture
Overview
This document describes the high-level architecture of the Slinky
slurm-operator.
Operator
The following diagram illustrates the operator, from a communication
perspective.

The slurm-operator follows the Kubernetes operator
pattern.
Operators are software extensions to Kubernetes that make use of custom
resources to manage applications and their components. Operators follow
Kubernetes principles, notably the control loop.
The slurm-operator has one controller for each Custom Resource Definition
(CRD) that it is responsible to manage. Each controller has a control loop where
the state of the Custom Resource (CR) is reconciled.
Often, an operator is only concerned about data reported by the Kubernetes API.
In our case, we are also concerned about data reported by the Slurm API, which
influences how the slurm-operator reconciles certain CRs.
Slurm
The following diagram illustrates a containerized Slurm cluster, from a
communication perspective.

For additional information about Slurm, see the slurm docs.
Hybrid
The following hybrid diagram is an example. There are many different
configurations for a hybrid setup. The core takeaways are: slurmd can be on
bare-metal and still be joined to your containerized Slurm cluster; external
services that your Slurm cluster needs or wants (e.g. AD/LDAP, NFS, MariaDB) do
not have to live in Kubernetes to be functional with your Slurm cluster.

Autoscale
Kubernetes supports resource autoscaling. In the context of Slurm, autoscaling
Slurm compute nodes can be quite useful when your Kubernetes and Slurm clusters
have workload fluctuations.

See the autoscaling guide for additional information.
Directory Map
This project follows the conventions of:
api/
Contains Custom Kubernetes API definitions. These become Custom Resource
Definitions (CRDs) and are installed into a Kubernetes cluster.
cmd/
Contains code to be compiled into binary commands.
config/
Contains yaml configuration files used for kustomize deployments.
docs/
Contains project documentation.
hack/
Contains files for development and Kubebuilder. This includes a kind.sh script
that can be used to create a kind cluster with all pre-requisites for local
testing.
helm/
Contains helm deployments, including the configuration files such as
values.yaml.
Helm is the recommended method to install this project into your Kubernetes
cluster.
internal/
Contains code that is used internally. This code is not externally importable.
internal/controller/
Contains the controllers.
Each controller is named after the Custom Resource Definition (CRD) it manages.
Currently, this consists of the nodeset and the cluster CRDs.
2.3.1.2 - Cluster Controller
Overview
This controller is responsible for managing and reconciling the Cluster CRD. A
CRD represents communication to a Slurm cluster via slurmrestd and auth/jwt.
This controller uses the Slurm client library.
Sequence Diagram
sequenceDiagram
    autonumber

    actor User as User
    participant KAPI as Kubernetes API
    participant CC as Cluster Controller
    box Operator Internals
        participant SCM as Slurm Client Map
        participant SEC as Slurm Event Channel
    end %% Operator Internals

    note over KAPI: Handle CR Creation
    User->>KAPI: Create Cluster CR
    KAPI-->>CC: Watch Cluster CRD
    CC->>+KAPI: Get referenced secret
    KAPI-->>-CC: Return secret
    create participant SC as Slurm Client
    CC->>+SC: Create Slurm Client for Cluster
    SC-->>-CC: Return Slurm Client Status
    loop Watch Slurm Nodes
        SC->>+SAPI: Get Slurm Nodes
        SAPI-->>-SC: Return Slurm Nodes
        SC->>SEC: Add Event for Cache Delta
    end %% loop Watch Slurm Nodes
    CC->>SCM: Add Slurm Client to Map
    CC->>+SC: Ping Slurm Control Plane
    SC->>+SAPI: Ping Slurm Control Plane
    SAPI-->>-SC: Return Ping
    SC-->>-CC: Return Ping
    CC->>KAPI: Update Cluster CR Status

    note over KAPI: Handle CR Deletion
    User->>KAPI: Delete Cluster CR
    KAPI-->>CC: Watch Cluster CRD
    SCM-->>CC: Lookup Slurm Client
    destroy SC
    CC-)SC: Shutdown Slurm Client
    CC->>SCM: Remove Slurm Client from Map

    participant SAPI as Slurm REST API
2.3.1.3 - NodeSet Controller
Overview
The nodeset controller is responsible for managing and reconciling the NodeSet
CRD, which represents a set of homogeneous Slurm Nodes.
Design
This controller is responsible for managing and reconciling the NodeSet CRD. In
addition to the regular responsibility of managing resources in Kubernetes via
the Kubernetes API, this controller should take into consideration the state of
Slurm to make certain reconciliation decisions.
Sequence Diagram
sequenceDiagram
    autonumber

    actor User as User
    participant KAPI as Kubernetes API
    participant NS as NodeSet Controller
    box Operator Internals
        participant SCM as Slurm Client Map
        participant SEC as Slurm Event Channel
    end %% Operator Internals
    participant SC as Slurm Client
    participant SAPI as Slurm REST API

    loop Watch Slurm Nodes
        SC->>+SAPI: Get Slurm Nodes
        SAPI-->>-SC: Return Slurm Nodes
        SC->>SEC: Add Event for Cache Delta
    end %% loop Watch Slurm Nodes

    note over KAPI: Handle CR Update
    SEC-->>NS: Watch Event Channel
    User->>KAPI: Update NodeSet CR
    KAPI-->>NS: Watch NodeSet CRD
    opt Scale-out Replicas
        NS->>KAPI: Create Pods
    end %% Scale-out Replicas
    opt Scale-in Replicas
        SCM-->>NS: Lookup Slurm Client
        NS->>+SC: Drain Slurm Node
        SC->>+SAPI: Drain Slurm Node
        SAPI-->>-SC: Return Drain Slurm Node Status
        SC-->>-NS: Drain Slurm Node
        alt Slurm Node is Drained
            NS->>KAPI: Delete Pod
        else
            NS->>NS: Check Again Later
        end %% alt Slurm Node is Drained
    end %% opt Scale-in Replicas
2.3.1.4 - Cluster CRD
2.3.1.5 - NodeSet CRD
2.3.1.6 - Slurm
Slurm is an open source, fault-tolerant, and highly scalable cluster
management and job scheduling system for large and small Linux clusters. Slurm
requires no kernel modifications for its operation and is relatively
self-contained. As a cluster workload manager, Slurm has three key functions.
First, it allocates exclusive and/or non-exclusive access to resources
(compute nodes) to users for some duration of time so they can perform work.
Second, it provides a framework for starting, executing, and monitoring work
(normally a parallel job) on the set of allocated nodes. Finally, it
arbitrates contention for resources by managing a queue of pending work.
Optional plugins can be used for accounting, advanced reservation, gang
scheduling (time sharing for parallel jobs), backfill scheduling, topology
optimized resource selection, resource limits by user or bank account, and
sophisticated multifactor job prioritization algorithms.
Architecture
See the Slurm architecture docs for more information.
2.3.2 - Tasks
Guides to tasks related to the administration of a cluster running
slurm-operator.
2.3.2.1 - Autoscaling
Getting Started
Before attempting to autoscale NodeSets, Slinky should be fully deployed to a
Kubernetes cluster and Slurm jobs should be able to run.
Dependencies
Autoscaling requires additional services that are not included in Slinky. Follow
documentation to install Prometheus, Metrics Server, and KEDA.
Prometheus will install tools to report metrics and view them with Grafana. The
Metrics Server is needed to report CPU and memory usage for tools like
kubectl top. KEDA is recommended for autoscaling as it provides usability
improvements over standard the Horizontal Pod Autoscaler (HPA).
To add KEDA in the helm install, run
helm repo add kedacore https://kedacore.github.io/charts
Install the slurm-exporter. This chart is installed as a dependency of the
slurm helm chart by default. Configure using helm/slurm/values.yaml.
Verify KEDA Metrics API Server is running
$ kubectl get apiservice -l app.kubernetes.io/instance=keda
NAME                              SERVICE                                AVAILABLE   AGE
v1beta1.external.metrics.k8s.io   keda/keda-operator-metrics-apiserver   True        22h
KEDA provides the metrics apiserver required by HPA to scale on custom metrics
from Slurm. An alternative like Prometheus Adapter could be used for this, but
KEDA offers usability enhancements and improvements to HPA in addition to
including a metrics apiserver.
Autoscaling
Autoscaling NodeSets allows Slurm partitions to expand and contract in response
to the CPU and memory usage. Using Slurm metrics, NodeSets may also scale based
on Slurm specific information like the number of pending jobs or the size of the
largest pending job in a partition. There are many ways to configure
autoscaling. Experiment with different combinations based on the types of jobs
being run and the resources available in the cluster.
NodeSet Scale Subresource
Scaling a resource in Kubernetes requires that resources such as Deployments and
StatefulSets support the scale subresource. This is also true of the NodeSet
Custom Resource.
The scale subresource gives a standard interface to observe and control the
number of replicas of a resource. In the case of NodeSet, it allows Kubernetes
and related services to control the number of slurmd replicas running as part
of the NodeSet.
To manually scale a NodeSet, use the kubectl scale command. In this example,
the NodeSet (nss) slurm-compute-radar is scaled to 1.
$ kubectl scale -n slurm nss/slurm-compute-radar --replicas=1
nodeset.slinky.slurm.net/slurm-compute-radar scaled

$ kubectl get pods -o wide -n slurm -l app.kubernetes.io/instance=slurm-compute-radar
NAME                    READY   STATUS    RESTARTS   AGE     IP            NODE          NOMINATED NODE   READINESS GATES
slurm-compute-radar-0   1/1     Running   0          2m48s   10.244.4.17   kind-worker   <none>           <none>
This corresponds to the Slurm partition radar.
$ kubectl exec -n slurm statefulset/slurm-controller -- sinfo
PARTITION AVAIL  TIMELIMIT  NODES  STATE NODELIST
radar        up   infinite      1   idle kind-worker
NodeSets may be scaled to zero. In this case, there are no replicas of slurmd
running and all jobs scheduled to that partition will remain in a pending state.
$ kubectl scale nss/slurm-compute-radar -n slurm --replicas=0
nodeset.slinky.slurm.net/slurm-compute-radar scaled
For NodeSets to scale on demand, an autoscaler needs to be deployed. KEDA allows
resources to scale from 0<->1 and also creates an HPA to scale based on scalers
like Prometheus and more.
KEDA ScaledObject
KEDA uses the Custom Resource ScaledObject to monitor and scale a resource. It
will automatically create the HPA needed to scale based on external triggers
like Prometheus. With Slurm metrics, NodeSets may be scaled based on data
collected from the Slurm restapi.
This example ScaledObject will watch the number of jobs pending for the
partition radar and scale the NodeSet slurm-compute-radar until a threshold
value is satisfied or maxReplicaCount is reached.
apiVersion: keda.sh/v1alpha1
kind: ScaledObject
metadata:
  name: scale-radar
spec:
  scaleTargetRef:
    apiVersion: slinky.slurm.net/v1alpha1
    kind: NodeSet
    name: slurm-compute-radar
  idleReplicaCount: 0
  minReplicaCount: 1
  maxReplicaCount: 3
  triggers:
    - type: prometheus
      metricType: Value
      metadata:
        serverAddress: http://prometheus-kube-prometheus-prometheus.prometheus:9090
        query: slurm_partition_pending_jobs{partition="radar"}
        threshold: "5"
Note: The Prometheus trigger is using metricType: Value instead of the
default AverageValue. AverageValue calculates the replica count by averaging
the threshold across the current replica count.
Check ScaledObject documentation for a full list of allowable options.
In this scenario, the ScaledObject scale-radar will query the Slurm metric
slurm_partition_pending_jobs from Prometheus with the label
partition="radar".
When there is activity on the trigger (at least one pending job), KEDA will
scale the NodeSet to minReplicaCount and then let HPA handle scaling up to
maxReplicaCount or back down to minReplicaCount. When there is no activity
on the trigger after a configurable amount of time, KEDA will scale the NodeSet
to idleReplicaCount. See the KEDA documentation on idleReplicaCount for
more examples.
Note: The only supported value for idleReplicaCount is 0 due to
limitations on how the HPA controller works.
To verify a KEDA ScaledObject, apply it to the cluster in the appropriate
namespace on a NodeSet that has no replicas.
$ kubectl scale nss/slurm-compute-radar -n slurm --replicas=0
nodeset.slinky.slurm.net/slurm-compute-radar scaled
Wait for Slurm to report that the partition has no nodes.
$ slurm@slurm-controller-0:/tmp$ sinfo -p radar
PARTITION AVAIL  TIMELIMIT  NODES  STATE NODELIST
radar        up   infinite      0    n/a
Apply the ScaledObject using kubectl to the correct namespace and verify the
KEDA and HPA resources are created.
$ kubectl apply -f scaledobject.yaml -n slurm
scaledobject.keda.sh/scale-radar created

$ kubectl get -n slurm scaledobjects
NAME           SCALETARGETKIND                     SCALETARGETNAME        MIN   MAX   TRIGGERS     AUTHENTICATION   READY   ACTIVE   FALLBACK   PAUSED    AGE
scale-radar    slinky.slurm.net/v1alpha1.NodeSet   slurm-compute-radar    1     5     prometheus                    True    False    Unknown    Unknown   28s

$ kubectl get -n slurm hpa
NAME                    REFERENCE                      TARGETS       MINPODS   MAXPODS   REPLICAS   AGE
keda-hpa-scale-radar    NodeSet/slurm-compute-radar    <unknown>/5   1         5         0          32s
Once the ScaledObject and HPA are created, initiate some jobs to test that the
NodeSet scale subresource is scaled in response.
$ sbatch --wrap "sleep 30" --partition radar --exclusive
The NodeSet will scale to minReplicaCount in response to activity on the
trigger. Once the number of pending jobs crosses the configured threshold
(submit more exclusive jobs to the partition), more replicas will be created to
handle the additional demand. Until the threshold is exceeded, the NodeSet
will remain at minReplicaCount.
Note: This example only works well for single node jobs, unless threshold
is set to 1. In this case, HPA will continue to scale up NodeSet as long as
there is a pending job until up until it reaches the maxReplicaCount.
After the default coolDownPeriod of 5 minutes without activity on the trigger,
KEDA will scale the NodeSet down to 0.
2.3.2.2 - Development
This document aims to provide enough information that you can get started with
development on this project.
Getting Started
You will need a Kubernetes cluster to run against. You can use KIND to get a
local cluster for testing, or run against your choice of remote cluster.
Note: Your controller will automatically use the current context in your
kubeconfig file (i.e. whatever cluster kubectl cluster-info shows).
Dependencies
Install KIND and Golang binaries for pre-commit hooks.
sudo apt-get install golang
make install
Pre-Commit
Install pre-commit and install the git hooks.
sudo apt-get install pre-commit
pre-commit install
Docker
Install Docker and configure rootless Docker.
After, test that your user account and communicate with docker.
Helm
Install Helm.
sudo snap install helm --classic
Skaffold
Install Skaffold.
curl -Lo skaffold https://storage.googleapis.com/skaffold/releases/latest/skaffold-linux-amd64 && \
sudo install skaffold /usr/local/bin/
If google-cloud-sdk is installed, skaffold is available as an additional
component.
sudo apt-get install -y google-cloud-cli-skaffold
Kubernetes Client
Install kubectl.
sudo snap install kubectl --classic
If google-cloud-sdk is installed, kubectl is available as an additional
component.
sudo apt-get install -y kubectl
Running on the Cluster
For development, all Helm deployments use a values-dev.yaml. If they do not
exist in your environment yet or you are unsure, safely copy the values.yaml
as a base by running:
Automatic
You can use Skaffold to build and push images, and deploy components using:
cd helm/slurm-operator/
skaffold run
NOTE: The skaffold.yaml is configured to inject the image and tag into the
values-dev.yaml so they are correctly referenced.
Operator
The slurm operator aims to follow the Kubernetes Operator
pattern.
It uses Controllers, which provide a reconcile function
responsible for synchronizing resources until the desired state is reached on
the cluster.
Install CRDs
When deploying a helm chart with skaffold or helm, the CRDs defined in its
crds/ directory will be installed if not already present in the cluster.
Uninstall CRDs
To delete the Operator CRDs from the cluster:
WARNING: CRDs do not upgrade! The old ones must be uninstalled first so the
new ones can be installed. This should only be done in development.
Modifying the API Definitions
If you are editing the API definitions, generate the manifests such as CRs or
CRDs using:
Slurm Version Changed
If the Slurm version has changed, generate the new OpenAPI spec and its golang
client code using:
NOTE: Update code interacting with the API in accordance with the
slurmrestd plugin lifecycle.
Running the operator locally
Install the operator’s CRDs with make install.
Launch the operator via the VSCode debugger using the “Launch Operator” launch
task.
Because the operator will be running outside of Kubernetes and needs to
communicate to the Slurm cluster, set the following options in you Slurm helm
chart’s values.yaml:
debug.enable=truedebug.localOperator=true
If running on a Kind cluster, also set:
debug.disableCgroups=true
If the Slurm helm chart is being deployed with skaffold, run
skaffold run --port-forward --tail. It is configured to automatically
port-forward the restapi for the local operator to
communicate with the Slurm cluster.
If skaffold is not used, manually run
kubectl port-forward --namespace slurm services/slurm-restapi 6820:6820 for
the local operator to communicate with the Slurm cluster.
After starting the operator, verify it is able to contact the Slurm cluster by
checking that the Cluster CR has been marked ready:
$ kubectl get --namespace slurm clusters.slinky.slurm.net
NAME     READY   AGE
slurm    true    110s
See skaffold port-forwarding to learn how skaffold
automatically detects which services to forward.
Slurm Cluster
Get into a Slurm pod that can submit workload.
kubectl --namespace=slurm exec -it deployments/slurm-login -- bash -l
kubectl --namespace=slurm exec -it statefulsets/slurm-controller -- bash -l
cloud-provider-kind -enable-lb-port-mapping &
SLURM_LOGIN_PORT="$(kubectl --namespace=slurm get services -l app.kubernetes.io/name=login,app.kubernetes.io/instance=slurm -o jsonpath="{.items[0].status.loadBalancer.ingress[0].ports[0].port}")"
SLURM_LOGIN_IP="$(kubectl --namespace=slurm get services -l app.kubernetes.io/name=login,app.kubernetes.io/instance=slurm -o jsonpath="{.items[0].status.loadBalancer.ingress[0].ip}")"
ssh -p "$SLURM_LOGIN_PORT" "${USER}@${SLURM_LOGIN_IP}"
2.3.2.3 - Using Pyxis
Overview
This guide tells how to configure your Slurm cluster to use pyxis (and
enroot), a Slurm SPANK plugin for containerized jobs with Nvidia GPU
support.
Configure plugstack.conf to include the pyxis configuration.
Warning: In plugstack.conf, you must use glob syntax to avoid slurmctld
failure while trying to resolve the paths in the includes. Only the login and
slurmd pods should actually have the pyxis libraries installed.
slurm:
  configFiles:
    plugstack.conf: |
      include /usr/share/pyxis/*
  ...
Configure one or more NodeSets and the login pods to use a pyxis OCI image.
login:
  image:
    repository: ghcr.io/slinkyproject/login-pyxis
  ...
compute:
  nodesets:
    - name: debug
      image:
        repository: ghcr.io/slinkyproject/slurmd-pyxis
      ...
To make enroot activity in the login container permissible, it requires
securityContext.privileged=true.
login:
  image:
    repository: ghcr.io/slinkyproject/login-pyxis
  securityContext:
    privileged: true
Test
Submit a job to a Slurm node.
$ srun --partition=debug grep PRETTY /etc/os-release
PRETTY_NAME="Ubuntu 24.04.2 LTS"
Submit a job to a Slurm node with pyxis and it will launch in its requested
container.
$ srun --partition=debug --container-image=alpine:latest grep PRETTY /etc/os-release
pyxis: importing docker image: alpine:latest
pyxis: imported docker image: alpine:latest
PRETTY_NAME="Alpine Linux v3.21"
Warning: SPANK plugins will only work on specific Slurm node that have
them and is configured to use them. It is best to constrain where jobs run
with --partition=<partition>, --batch=<features>, and/or
--constraint=<features> to ensure a compatible computing environment.
If the login container has securityContext.privileged=true, enroot activity is
permissible. You can test the functionality with the following:
enroot import docker://alpine:latest
2.3.3 - Quickstart Guides
2.3.3.1 - QuickStart Guide for Amazon EKS
This quickstart guide will help you get the slurm-operator running and deploy
Slurm clusters to Amazon EKS.
Setup
Setup a cluster on EKS:
eksctl create cluster \
 --name slinky-cluster \
 --region us-west-2 \
 --nodegroup-name slinky-nodes \
 --node-type t3.medium \
 --nodes 2
Setup kubectl to point to your new cluster:
aws eks
--region us-west-2 update-kubeconfig --name slinky-cluster
Pre-Requisites
Install the pre-requisite helm charts:
helm repo add prometheus-community https://prometheus-community.github.io/helm-charts
helm repo add metrics-server https://kubernetes-sigs.github.io/metrics-server/
helm repo add bitnami https://charts.bitnami.com/bitnami
helm repo add jetstack https://charts.jetstack.io

helm repo update
helm install cert-manager jetstack/cert-manager \
--namespace cert-manager \
--create-namespace \
--set crds.enabled=true

helm install prometheus prometheus-community/kube-prometheus-stack \
--namespace prometheus \
--create-namespace \
--set installCRDs=true
Install EBS CSI Driver
helm install aws-ebs-csi aws-ebs-csi-driver/aws-ebs-csi-driver \
--namespace kube-system
AWS Permissions
You will need to make sure your IAM user has the proper permissions.
Step 1: Identify the IAM Role
Run the following AWS CLI command to get the IAM role attached to your EKS
worker nodes:
aws eks describe-nodegroup \
 --cluster-name slinky-cluster \
 --nodegroup-name slinky-nodes \
 --query "nodegroup.nodeRole" \
 --output text
This will return something like:
arn:aws:iam::017820679962:role/eksctl-slurm-cluster-nodegroup-my-nod-NodeInstanceRole-hpbRU4WRvvlK
The IAM role name here is
eksctl-slurm-cluster-nodegroup-my-nod-NodeInstanceRole-hpbRU4WRvvlK.
Step 2: Attach the Required IAM Policy for EBS CSI Driver
Attach the AmazonEBSCSIDriverPolicy managed IAM policy to this role.
Run the following command:
 aws iam attach-role-policy \
 --role-name eksctl-slurm-cluster-nodegroup-my-nod-NodeInstanceRole-hpbRU4WRvvlK \
 --policy-arn arn:aws:iam::aws:policy/service-role/AmazonEBSCSIDriverPolicy
Create StorageClass
You will need to create a StorageClass to use.
Here is an example storageclass.yaml file for a StorageClass
apiVersion: storage.k8s.io/v1 kind: StorageClass
metadata: name: standard provisioner: ebs.csi.aws.com reclaimPolicy: Delete
volumeBindingMode: WaitForFirstConsumer parameters: type: gp2 fsType: ext4
Create the StorageClass using your storageclass.yaml file.
kubectl apply -f storageclass.yaml
Slurm Operator
Download values and install the slurm-operator. You will need to update the
operator and webhook repository values to point to the desired container
repository.
curl -L https://raw.githubusercontent.com/SlinkyProject/slurm-operator/refs/tags/v0.3.0/helm/slurm-operator/values.yaml \
-o values-operator.yaml

helm install slurm-operator oci://ghcr.io/slinkyproject/charts/slurm-operator \
--values=values-operator.yaml \
--version=0.3.0 \
--namespace=slinky \
--create-namespace
Make sure the cluster deployed successfully with:
kubectl --namespace=slinky get pods
Output should be similar to:
NAME READY STATUS RESTARTS AGE
slurm-operator-7444c844d5-dpr5h 1/1 Running 0 5m00s
slurm-operator-webhook-6fd8d7857d-zcvqh 1/1 Running 0 5m00s
Slurm Cluster
Download values and install a Slurm cluster.
curl -L https://raw.githubusercontent.com/SlinkyProject/slurm-operator/refs/tags/v0.3.0/helm/slurm/values.yaml \
-o values-slurm.yaml

helm install slurm oci://ghcr.io/slinkyproject/charts/slurm \
--values=values-slurm.yaml \
--version=0.3.0 \
--namespace=slurm \
--create-namespace
Make sure the slurm cluster deployed successfully with:
kubectl --namespace=slurm get pods
Output should be similar to:
NAME READY STATUS RESTARTS AGE
slurm-accounting-0 1/1 Running 0 5m00s
slurm-compute-debug-0 1/1 Running 05m00s
slurm-controller-0 2/2 Running 0 5m00s
slurm-exporter-7b44b6d856-d86q5 1/1 Running 0 5m00s
slurm-mariadb-0 1/1 Running 0 5m00s
slurm-restapi-5f75db85d9-67gpl 1/1 Running 0 5m00s
Testing
To test Slurm functionality, connect to the controller to use Slurm client
commands:
kubectl --namespace=slurm exec -it statefulsets/slurm-controller -- bash --login
On the controller pod (e.g. host slurm@slurm-controller-0), run the following
commands to quickly test Slurm is functioning:
sinfo
srun
hostname sbatch --wrap="sleep 60" squeue
See Slurm Commands for
more details on how to interact with Slurm.
2.3.3.2 - QuickStart Guide for Google GKE
This quickstart guide will help you get the slurm-operator running and deploy
Slurm clusters to GKE.
Setup
Setup a cluster on GKE.
gcloud container clusters create slinky-cluster \
 --location=us-central1-a \
 --num-nodes=2 \
 --node-taints "" \
 --machine-type=c2-standard-16
Setup kubectl to point to your new cluster.
gcloud container clusters get-credentials slinky-cluster
Pre-Requisites
Install the pre-requisite helm charts.
helm repo add prometheus-community https://prometheus-community.github.io/helm-charts
helm repo add metrics-server https://kubernetes-sigs.github.io/metrics-server/
helm repo add bitnami https://charts.bitnami.com/bitnami
helm repo add jetstack https://charts.jetstack.io

helm repo update helm install cert-manager jetstack/cert-manager \
--namespace cert-manager \
--create-namespace \
--set crds.enabled=true

helm install prometheus prometheus-community/kube-prometheus-stack \
--namespace prometheus \
--create-namespace \
--set installCRDs=true
Slurm Operator
Download values and install the slurm-operator. You will need to update the
operator and webhook repository values to point to the desired container
repository.
curl -L https://raw.githubusercontent.com/SlinkyProject/slurm-operator/refs/tags/v0.3.0/helm/slurm-operator/values.yaml -o values-operator.yaml

helm install slurm-operator oci://ghcr.io/slinkyproject/charts/slurm-operator \
--values=values-operator.yaml \
--version=0.3.0 \
--namespace=slinky \
--create-namespace
Make sure the cluster deployed successfully with:
kubectl --namespace=slinky get pods
Output should be similar to:
NAME READY STATUS RESTARTS AGE
slurm-operator-7444c844d5-dpr5h 1/1 Running 0 5m00s
slurm-operator-webhook-6fd8d7857d-zcvqh 1/1 Running 0 5m00s
Slurm Cluster
Download values and install a Slurm cluster.
curl -L https://raw.githubusercontent.com/SlinkyProject/slurm-operator/refs/tags/v0.3.0/helm/slurm/values.yaml -o values-slurm.yaml

helm install slurm oci://ghcr.io/slinkyproject/charts/slurm \
--values=values-slurm.yaml \
--version=0.3.0 \
--namespace=slurm \
--create-namespace
Make sure the slurm cluster deployed successfully with:
kubectl --namespace=slurm get pods
Output should be similar to:
NAME READY STATUS RESTARTS AGE
slurm-accounting-0 1/1 Running 0 5m00s
slurm-compute-debug-0 1/1 Running 0
5m00s slurm-controller-0 2/2 Running 0 5m00s
slurm-exporter-7b44b6d856-d86q5 1/1 Running 0 5m00s
slurm-mariadb-0 1/1 Running 0 5m00s
slurm-restapi-5f75db85d9-67gpl 1/1 Running 0 5m00s
Testing
To test Slurm functionality, connect to the controller to use Slurm client
commands:
kubectl -n slurm exec -it slurm-controller-0 -- bash --login
On the controller pod (e.g. host slurm@slurm-controller-0), run the following
commands to quickly test Slurm is functioning:
sinfo
srun
hostname sbatch --wrap="sleep 60" squeue
See Slurm Commands for
more details on how to interact with Slurm.
2.3.3.3 - QuickStart Guide for Microsoft AKS
This quickstart guide will help you get the slurm-operator running and deploy
Slurm clusters to AKS.
Setup
Setup a resource group on AKS:
az group create --name slinky --location westus2
Setup a cluster on AKS:
az aks create \
--resource-group slinky \
--name slinky \
--location westus2 \
--node-vm-size Standard_D2s_v3
Setup kubectl to point to your new cluster:
az aks get-credentials --resource-group slinky --name slinky
Pre-Requisites
Install the pre-requisite helm charts:
helm repo add prometheus-community https://prometheus-community.github.io/helm-charts
helm repo add metrics-server https://kubernetes-sigs.github.io/metrics-server/
helm repo add bitnami https://charts.bitnami.com/bitnami
helm repo add jetstack https://charts.jetstack.io

helm repo update helm install cert-manager jetstack/cert-manager \
--namespace cert-manager \
--create-namespace \
--set crds.enabled=true

helm install prometheus prometheus-community/kube-prometheus-stack \
--namespace prometheus \
--create-namespace \
--set installCRDs=true
Slurm Operator
Download values and install the slurm-operator. You will need to update the
operator and webhook repository values to point to the desired container
repository.
curl -L https://raw.githubusercontent.com/SlinkyProject/slurm-operator/refs/tags/v0.3.0/helm/slurm-operator/values.yaml -o values-operator.yaml
Make sure you are authenticated and the proper role is assigned to pull your
images:
az acr login -n slinky

az aks show \
--resource-group slinky \
--name slinky \
--query identityProfile.kubeletidentity.clientId \
-o tsv

az role assignment create --assignee <clientId from above> \
--role AcrPull \
--scope $(az acr show --name slinky --query id -o tsv)

helm install slurm-operator oci://ghcr.io/slinkyproject/charts/slurm-operator \
--values=values-operator.yaml \
--version=0.3.0 \
--namespace=slinky \
--create-namespace
Make sure the cluster deployed successfully with:
kubectl --namespace=slinky get pods
Output should be similar to:
NAME READY STATUS RESTARTS AGE
slurm-operator-7444c844d5-dpr5h 1/1 Running 0 5m00s
slurm-operator-webhook-6fd8d7857d-zcvqh 1/1 Running 0 5m00s
Slurm Cluster
Download values and install a Slurm cluster.
curl -L https://raw.githubusercontent.com/SlinkyProject/slurm-operator/refs/tags/v0.3.0/helm/slurm/values.yaml -o values-slurm.yaml
By default the values-slurm.yaml file uses standard for
controller.persistence.storageClass and
mariadb.primary.persistence.storageClass. You will need to update this value
to default to use AKS’s default storageClass.
helm install slurm oci://ghcr.io/slinkyproject/charts/slurm \
--values=values-slurm.yaml \
--version=0.3.0 \
--namespace=slurm \
--create-namespace
Make sure the slurm cluster deployed successfully with:
kubectl --namespace=slurm get pods
Output should be similar to:
NAME READY STATUS RESTARTS AGE
slurm-accounting-0 1/1 Running 0 5m00s
slurm-compute-debug-0 1/1 Running 0
5m00s slurm-controller-0 2/2 Running 0 5m00s
slurm-exporter-7b44b6d856-d86q5 1/1 Running 0 5m00s
slurm-mariadb-0 1/1 Running 0 5m00s
slurm-restapi-5f75db85d9-67gpl 1/1 Running 0 5m00s
Testing
To test Slurm functionality, connect to the controller to use Slurm client
commands:
kubectl --namespace=slurm exec -it statefulsets/slurm-controller -- bash --login
On the controller pod (e.g. host slurm@slurm-controller-0), run the following
commands to quickly test Slurm is functioning:
sinfo
srun
hostname sbatch --wrap="sleep 60" squeue
See Slurm Commands for
more details on how to interact with Slurm.